Getting Started
Baari-Portfolio Admin Panel
- Uploaded Date: 01-Septmber-2025
- Project: Baari-Portfolio
- Author: SoftBaari
- Email: softbaari@gmail.com
Thank you for purchasing our product. If you have any questions that are beyond the scope of this documentation file, please feel free to email us via our user page contact form or directly to email at support@softbaari.com
Requirements
- PHP >= 8.2
- Ctype PHP Extension
- cURL PHP Extension
- DOM PHP Extension
- Fileinfo PHP Extension
- Filter PHP Extension
- Hash PHP Extension
- Mbstring PHP Extension
- OpenSSL PHP Extension
- PCRE PHP Extension
- PDO PHP Extension
- Session PHP Extension
- Tokenizer PHP Extension
- XML PHP Extension
For more information about deployment see the Laravel documentation here https://laravel.com/docs/12.x/deployment
Download Project from Codester
After successfully purchase Portfolio Baari download the project from Codester download page
Extract the downloaded file. You will have another zip file named portfolio.zip containing the main project's files and a documentation folder. You are reading this documentation, that means you already have theme both.
Creating Database
Before installing, you will need to create a new database. If you already know how to do this or have already created one, skip to the next step.
Note: Please use empty database. In most cases you should be able to create a database from your cpanel.
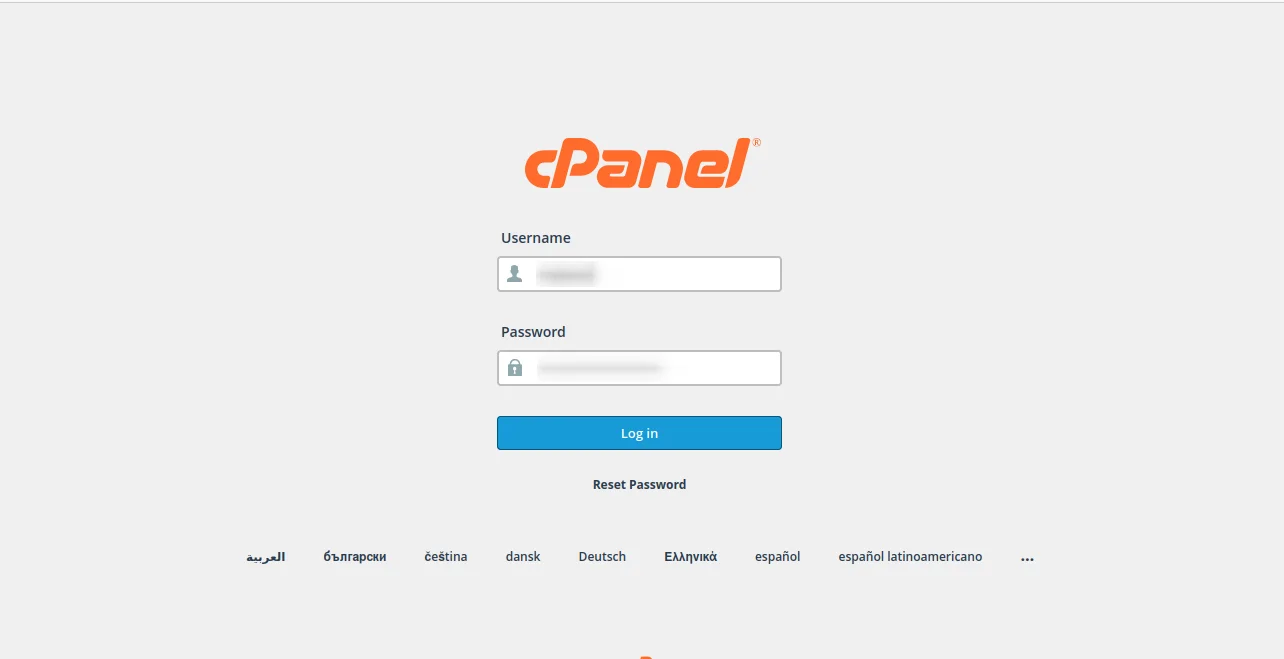
Login to your cPanel by entering this in your browser url
yourdomian.com/cpanel
Step: 1
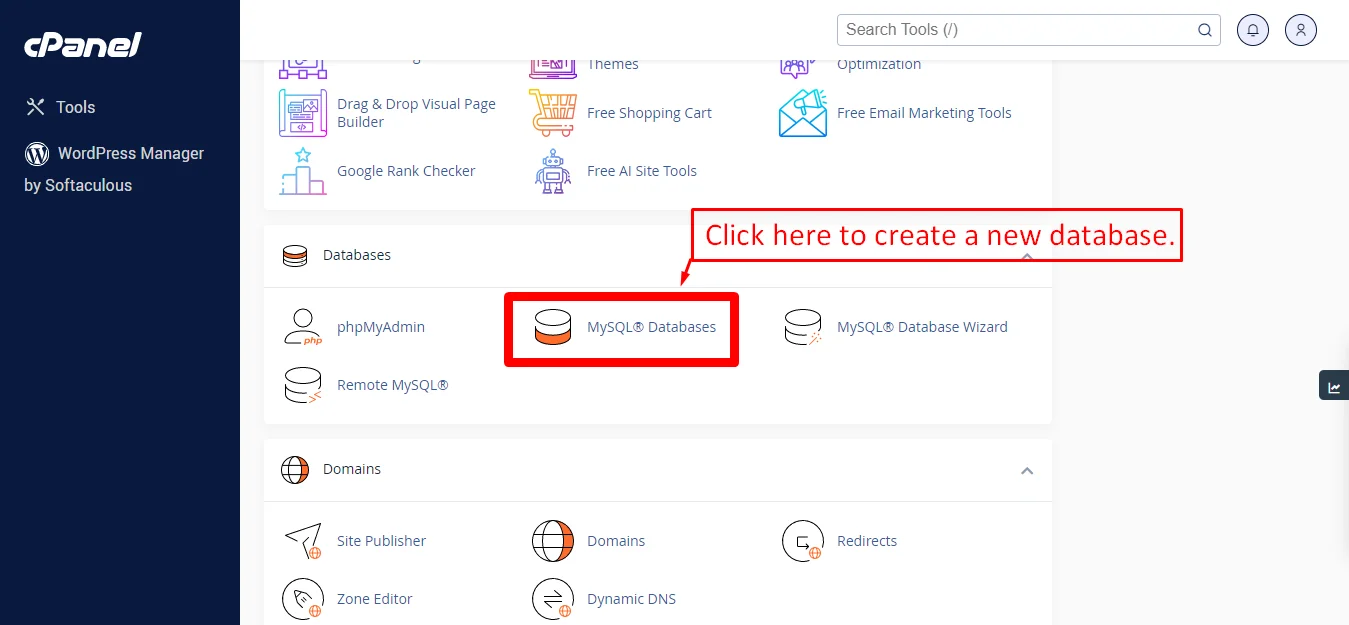
Step: 2

Step: 3
Now you need to create a new user. On the same page go to create a new database user
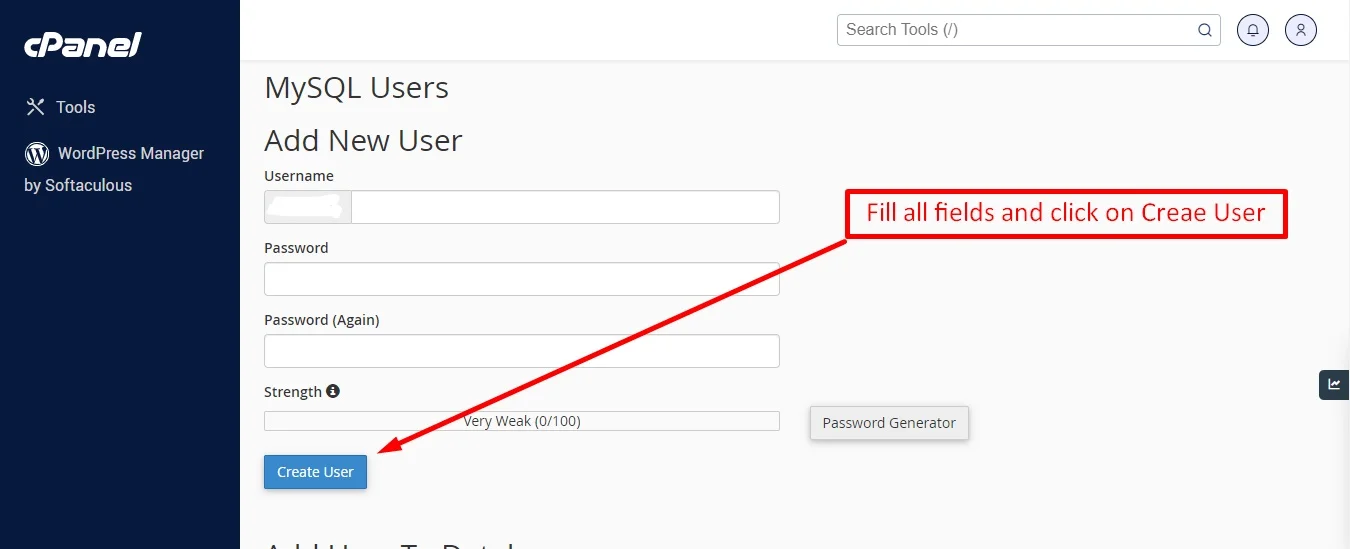
Step: 4
Now add the user to the database
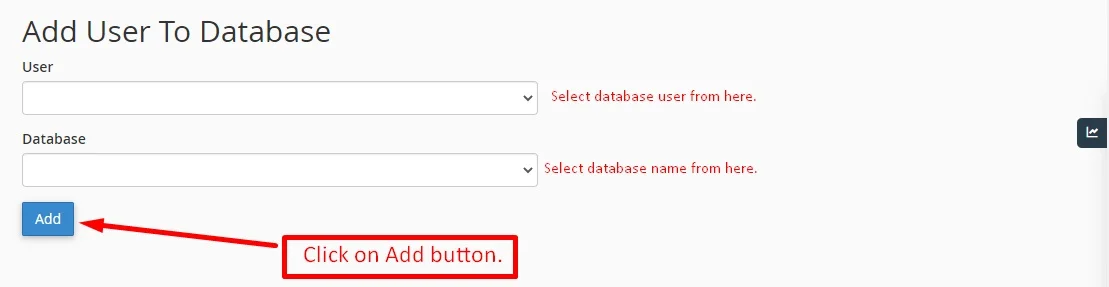
Step: 5
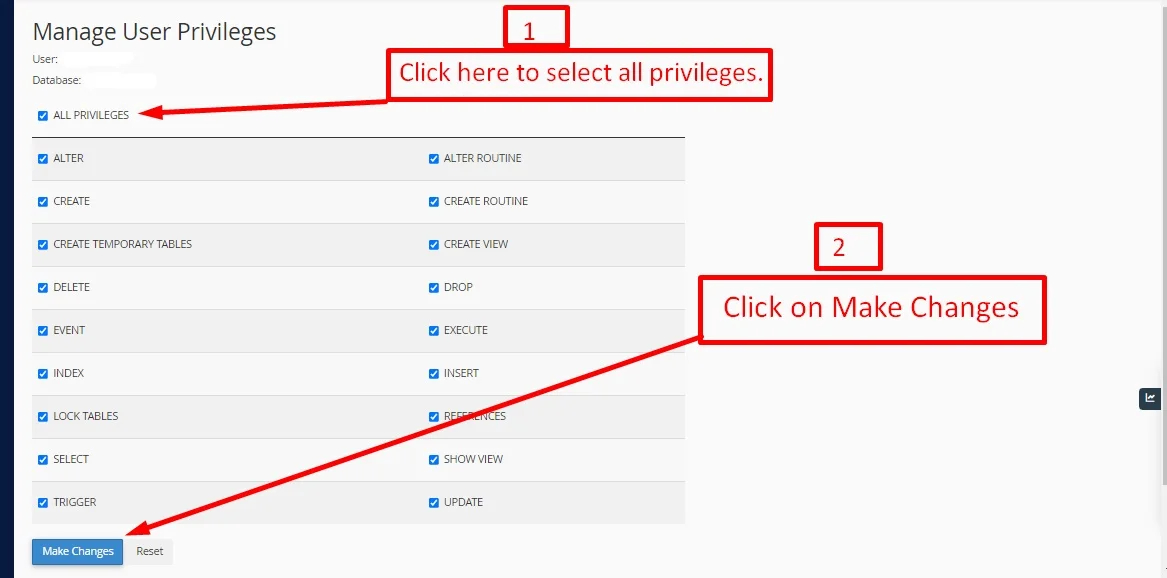
And select full permissions on the database to that user
Step: 6
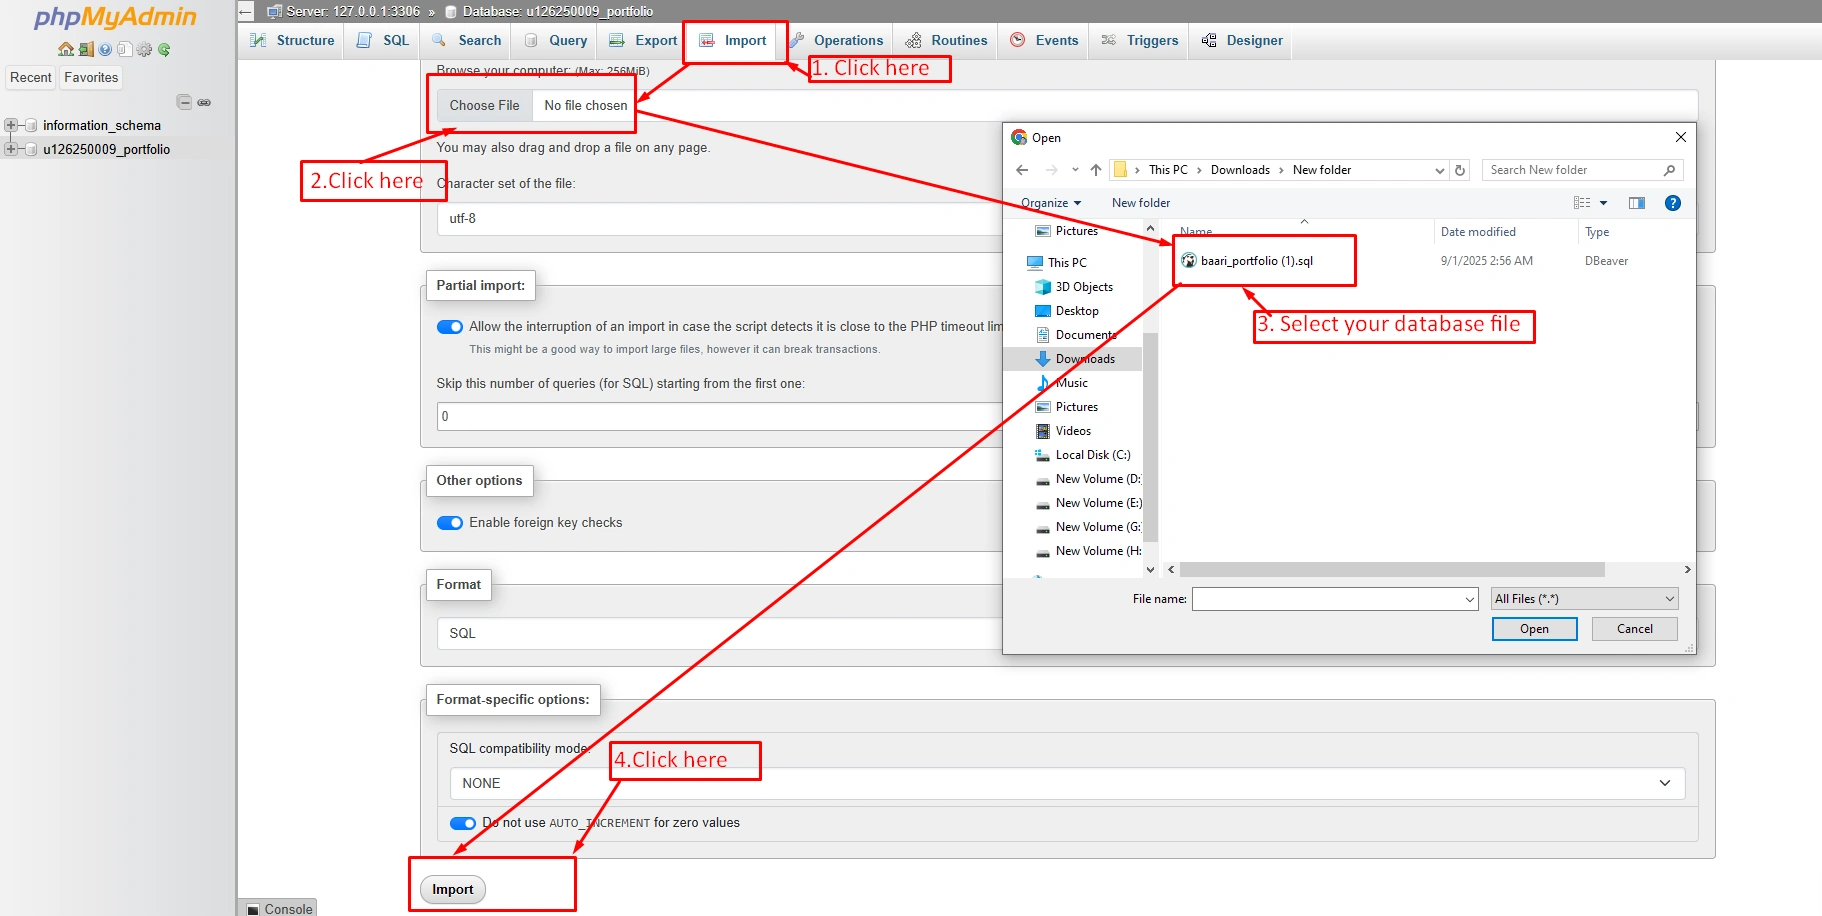
After creating a database, upload the downloaded database file
Uploading Files
On some operating systems, the dotfiles are hidden by default. Before starting to upload the files, please make sure your file explorer has the option to view hidden files turned on.
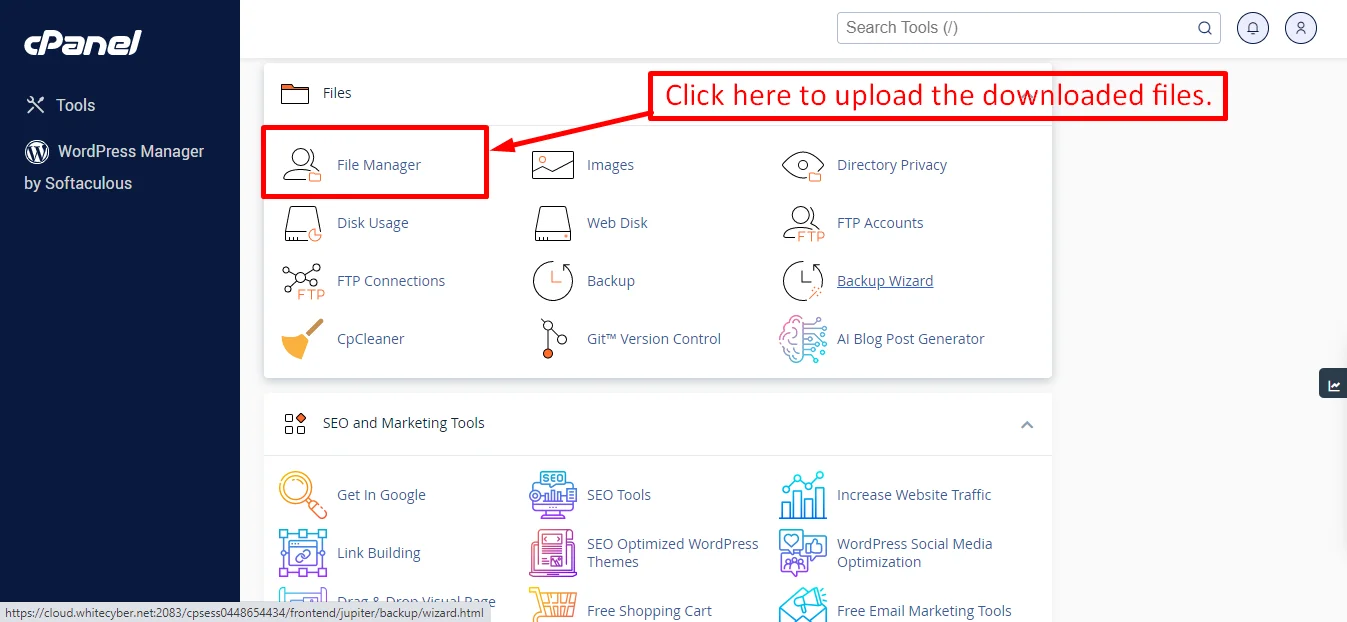
After creating a database, Upload the portfolio.zip file on the web root folder of your domain. This folder is generally called public_html, html, or example.com, but depending on your server's configuration, it might be named differently.
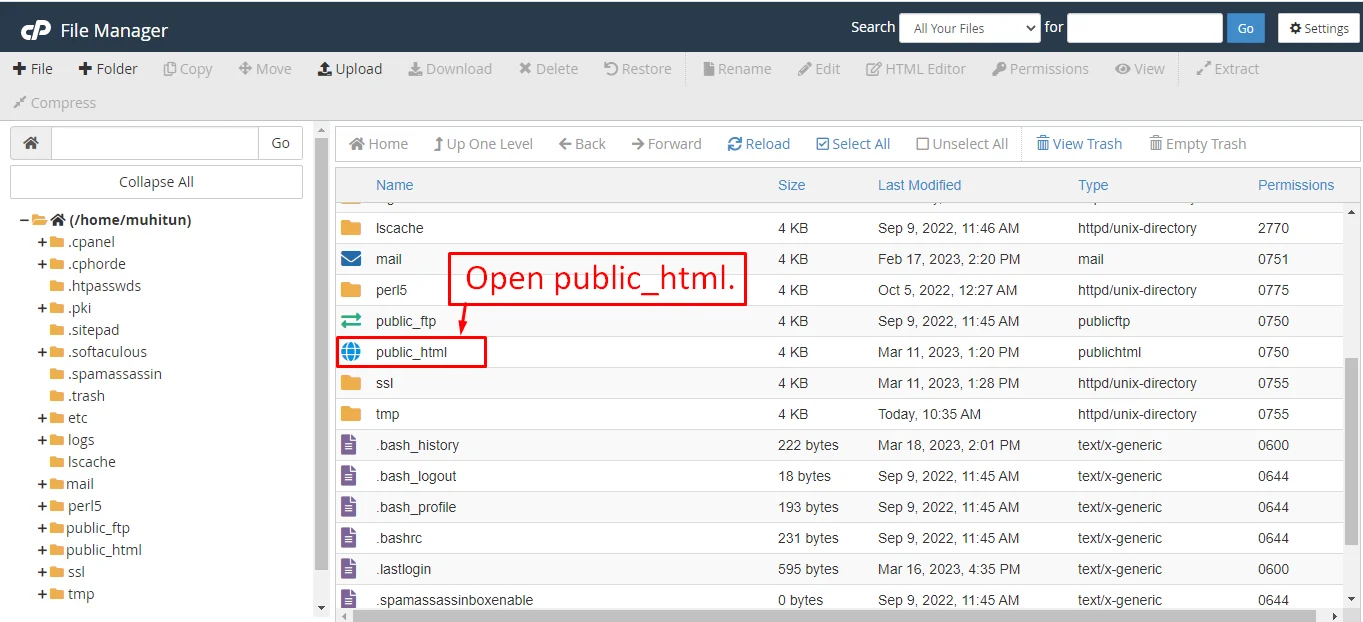
After that in the public_html directory upload the downloaded file.

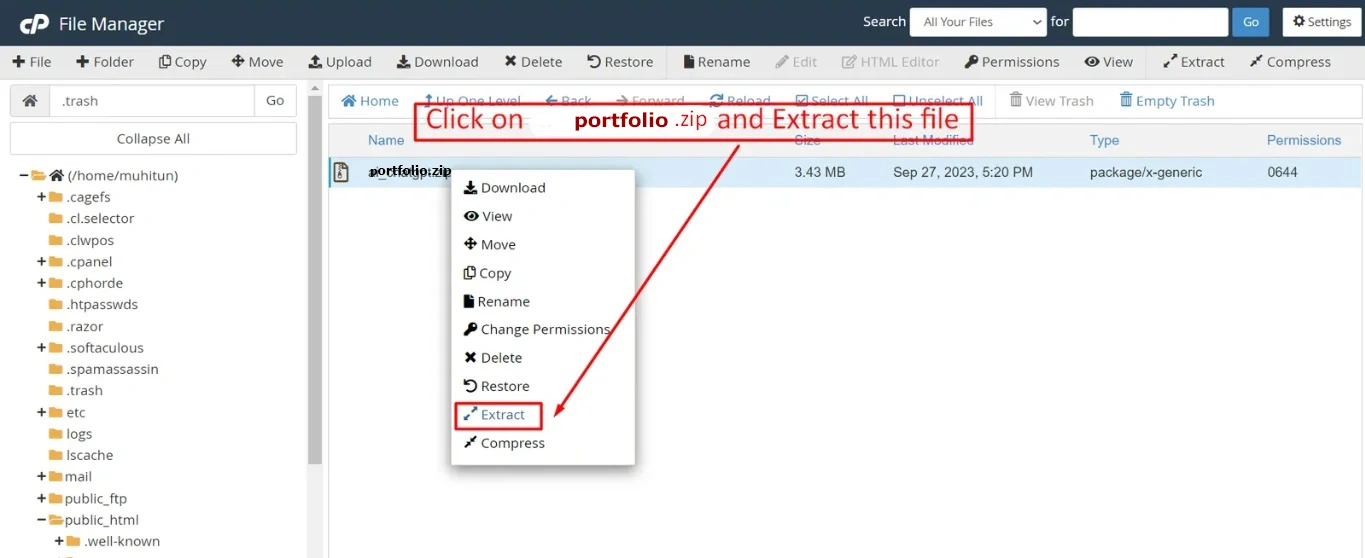
Note: Important Make sure that you have .env file in your folder.
Note: Make sure that .htaccess file got copied properly from the download to your server.
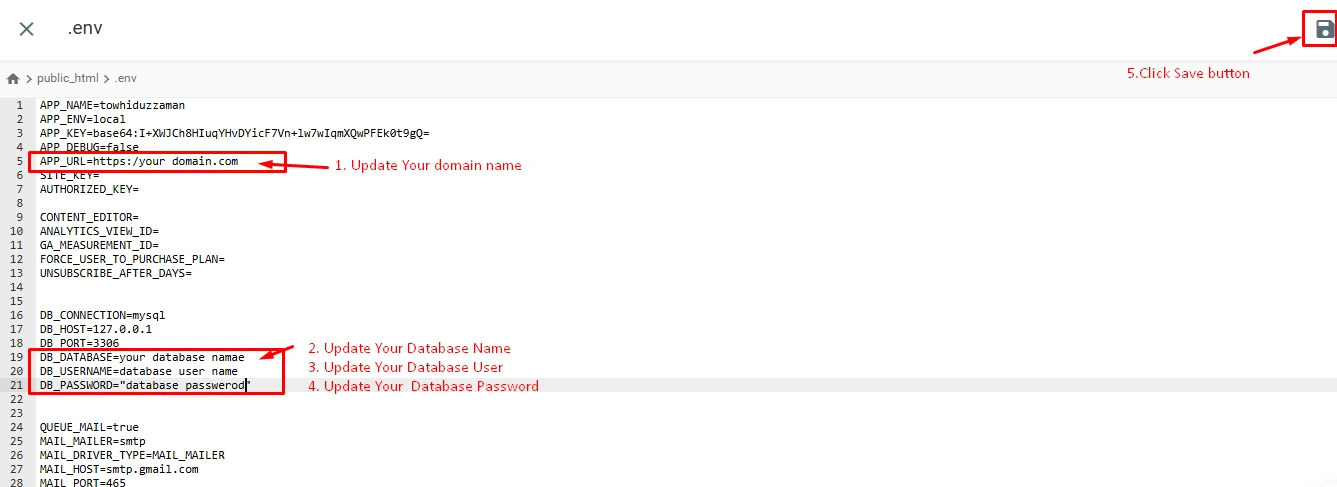
Edit .env file
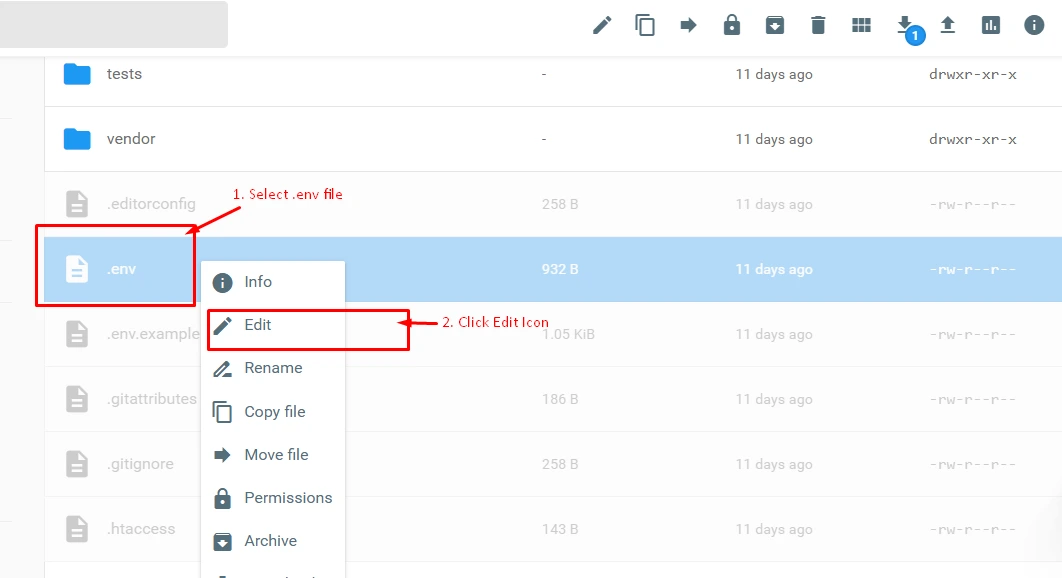
Now update app url, database, username and password in the .env file.
Run WebSite
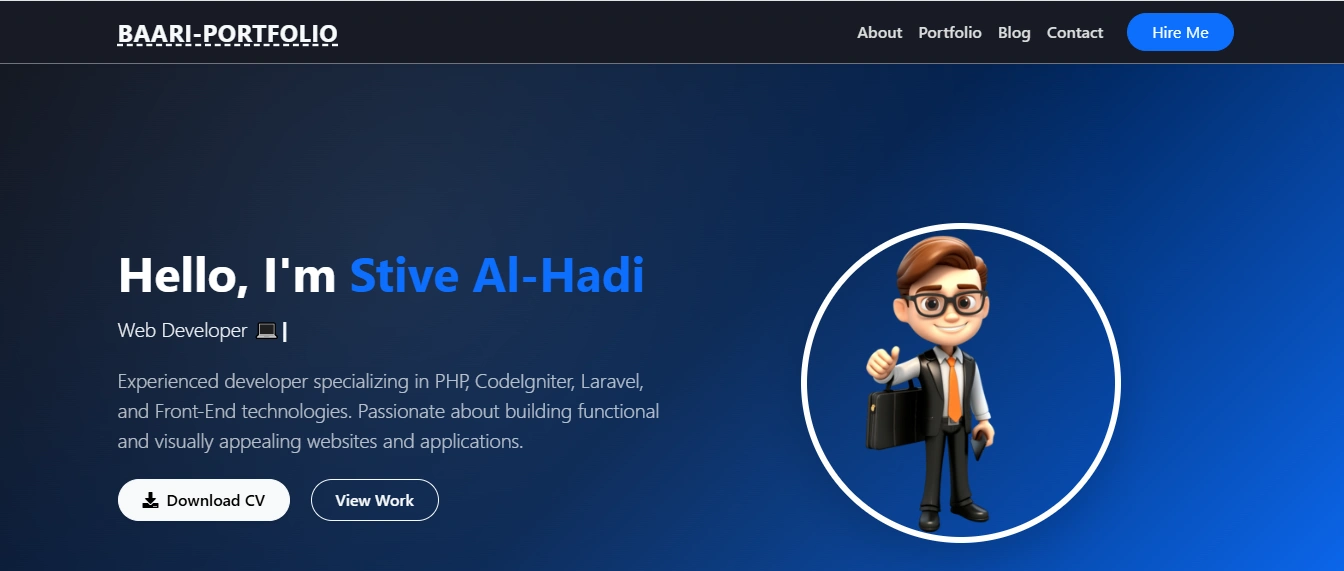
Open your browser and go to your website address, then your website will run and be visible.t
yourdomain.com/
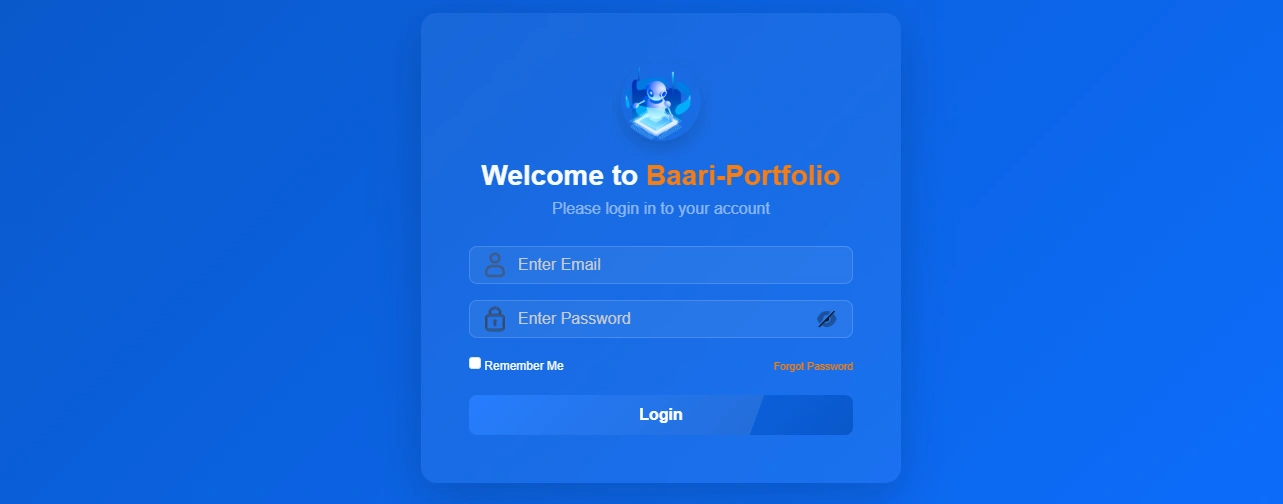
Default Password
yourdomain.com/login
You can login using your methods.
Admin
admin@baari.com
admin@baari
Dashboard
This is the admin dashboard page. The essential information regarding the project are displayed here.

User Section
This appears to be a screenshot of a user list page. User List functionalities typically allow users to collect and organize information about users. By clicking the "View" button, you can see the details of each user. You can also create a new user by clicking the "Add New user" button. Below, we'll describe how you can create a new user.
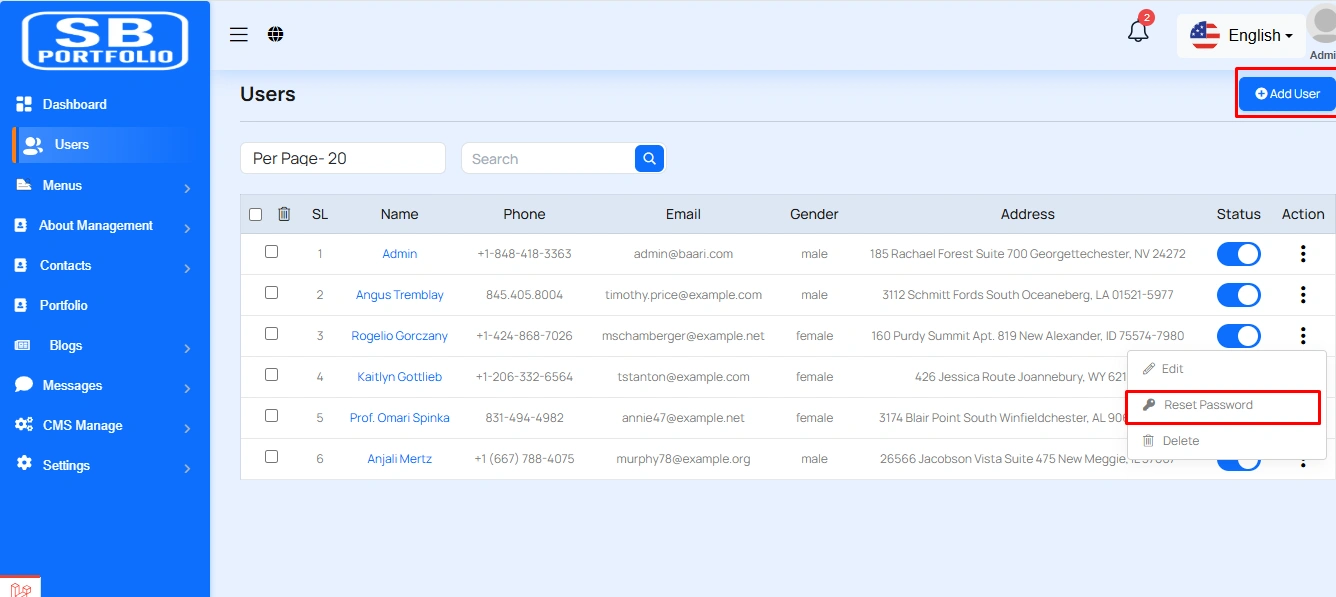
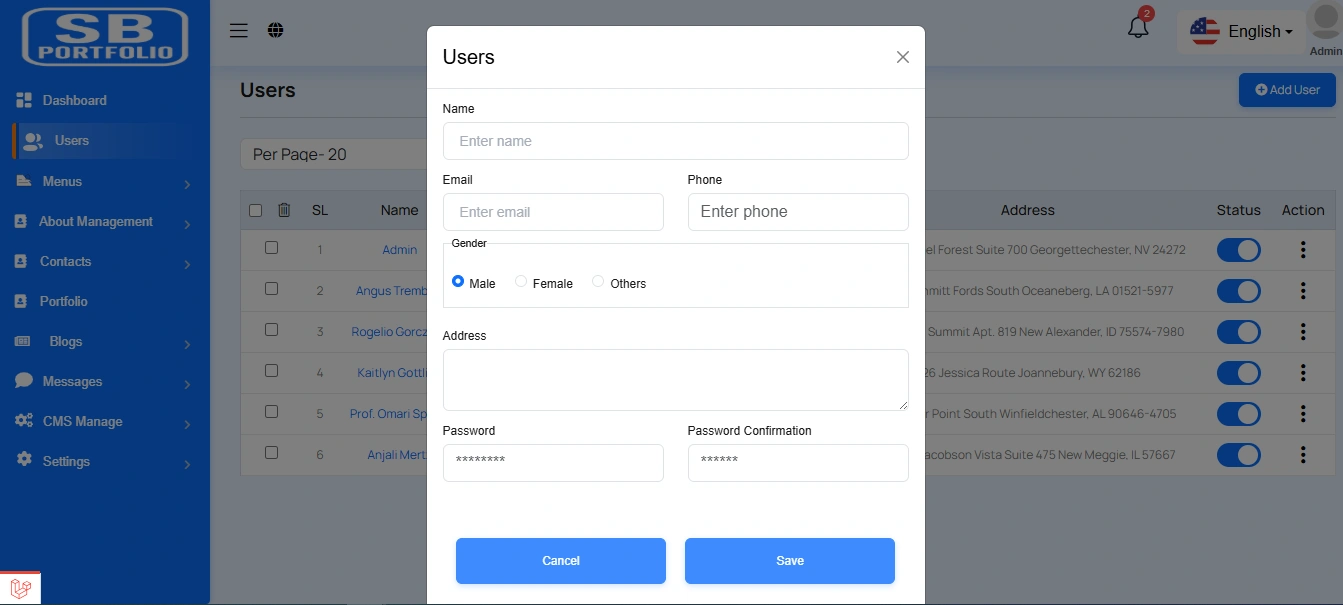
Create User
By clicking on the "Add User" button, you can create a new user. You will need to fill in the necessary fields. Here is the screenshot of the create user page.
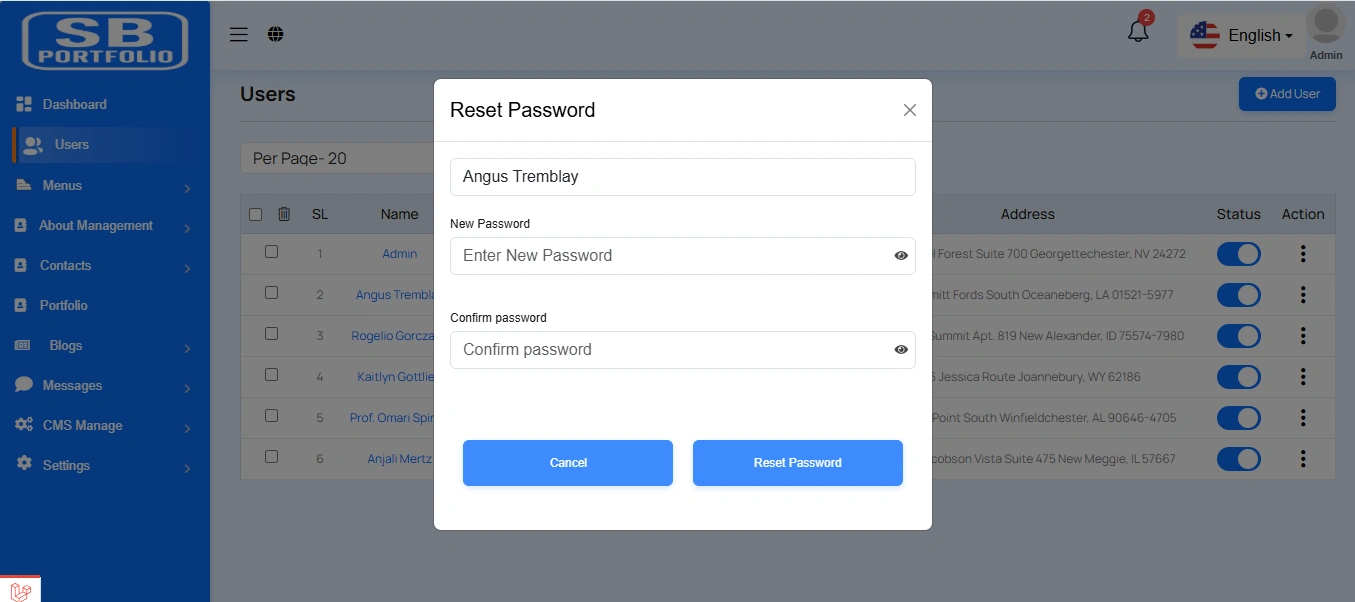
Reset Password
By clicking on the "Add User" button, you can reset a new password. You will need to fill in the necessary fields. Here is the screenshot of the reset password modal.
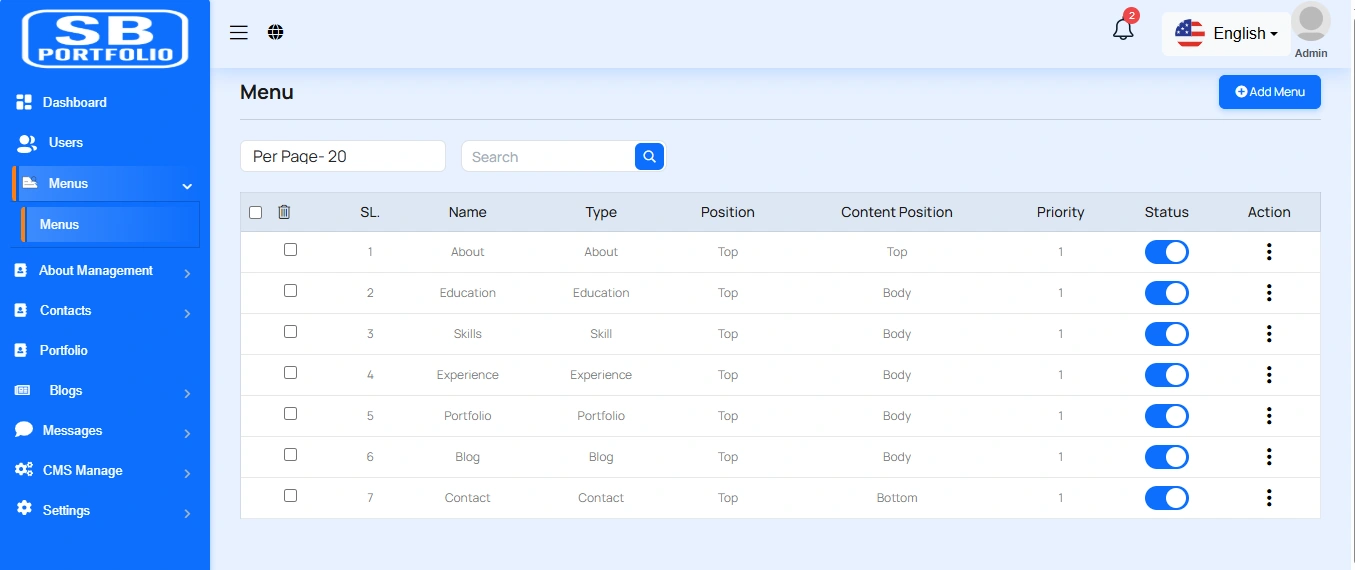
Menu List
This appears to be a screenshot of a user list page. Menu List functionalities typically allow users to collect and organize information about menus. By clicking the "View" button, you can see the details of each menu. You can also create a new menu by clicking the "Add New menu" button. Below, we'll describe how you can create a new menu.
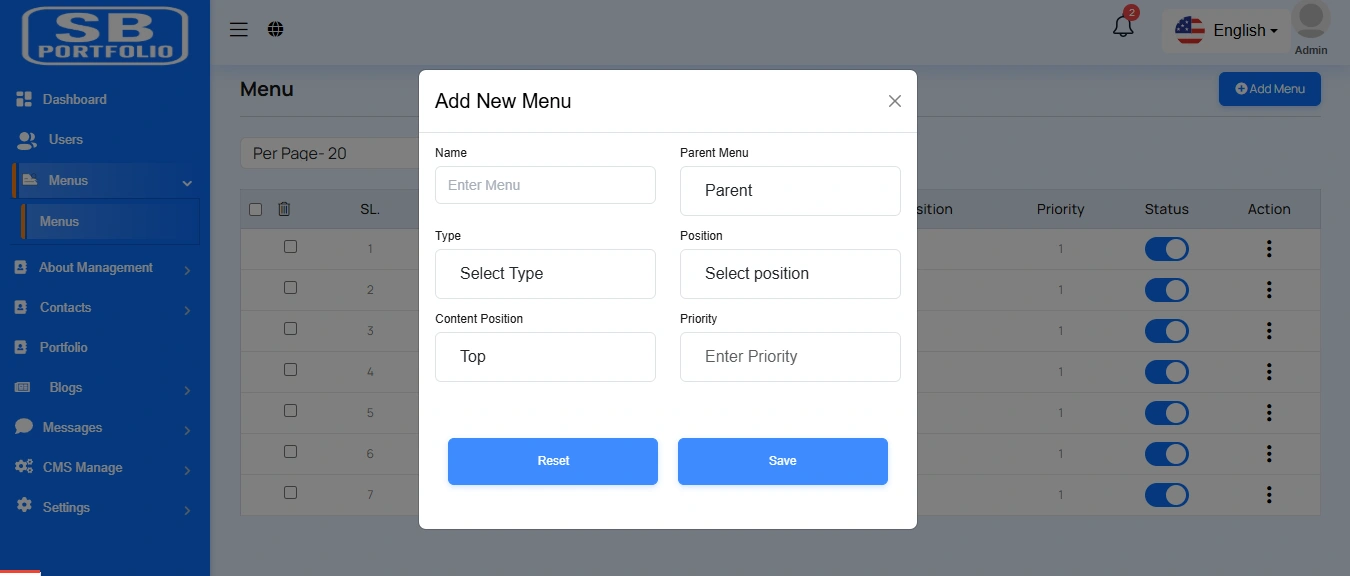
Create Menu
By clicking on the "Add Menu" button, you can create a new menu. You will need to fill in the necessary fields. Here is the screenshot of the create menu page.
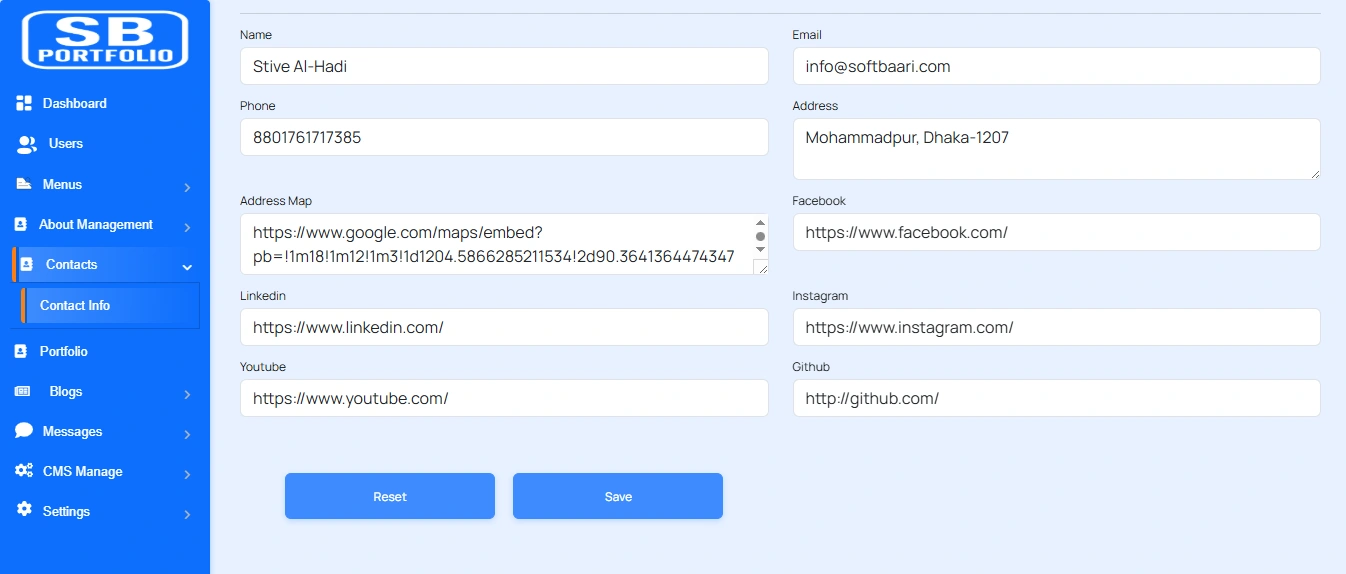
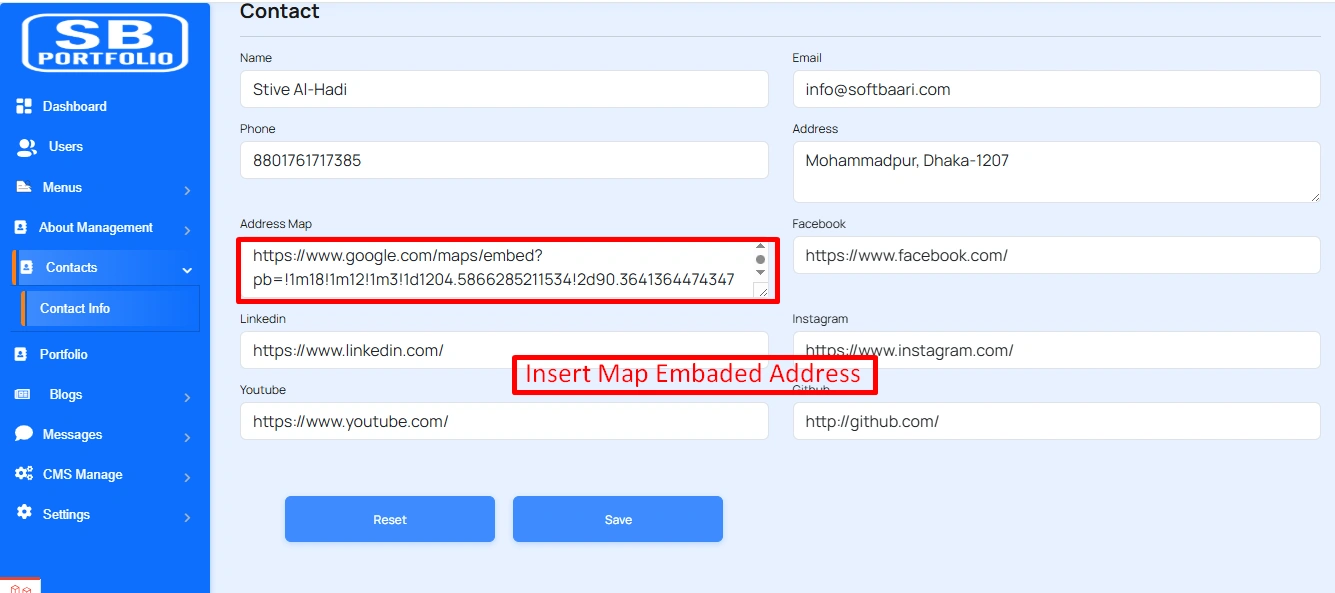
Contact Information
This appears to be a screenshot of a contact information page. Here, you can upate contact information.
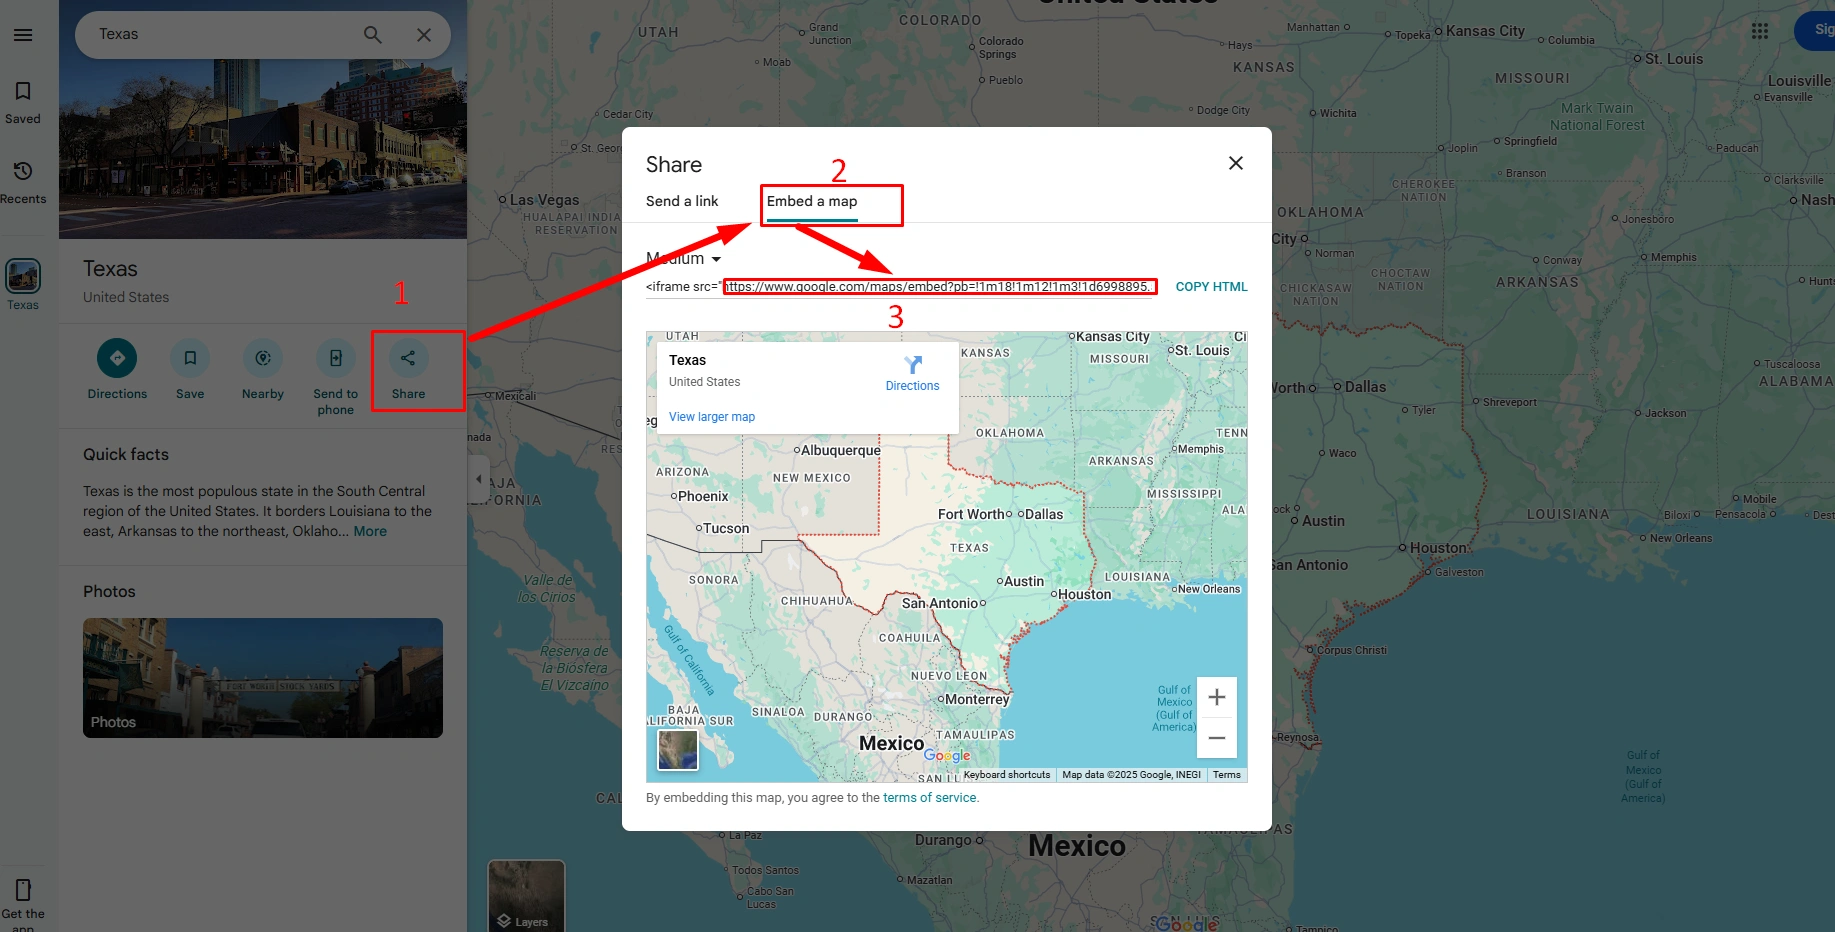
Copy Map Address
Select your location on the map and copy the address. Here is the screenshot of the copy map address.
Insert Map Address
Filup the map address form. You will need to fill in the necessary fields. Here is the screenshot of the create contact page.
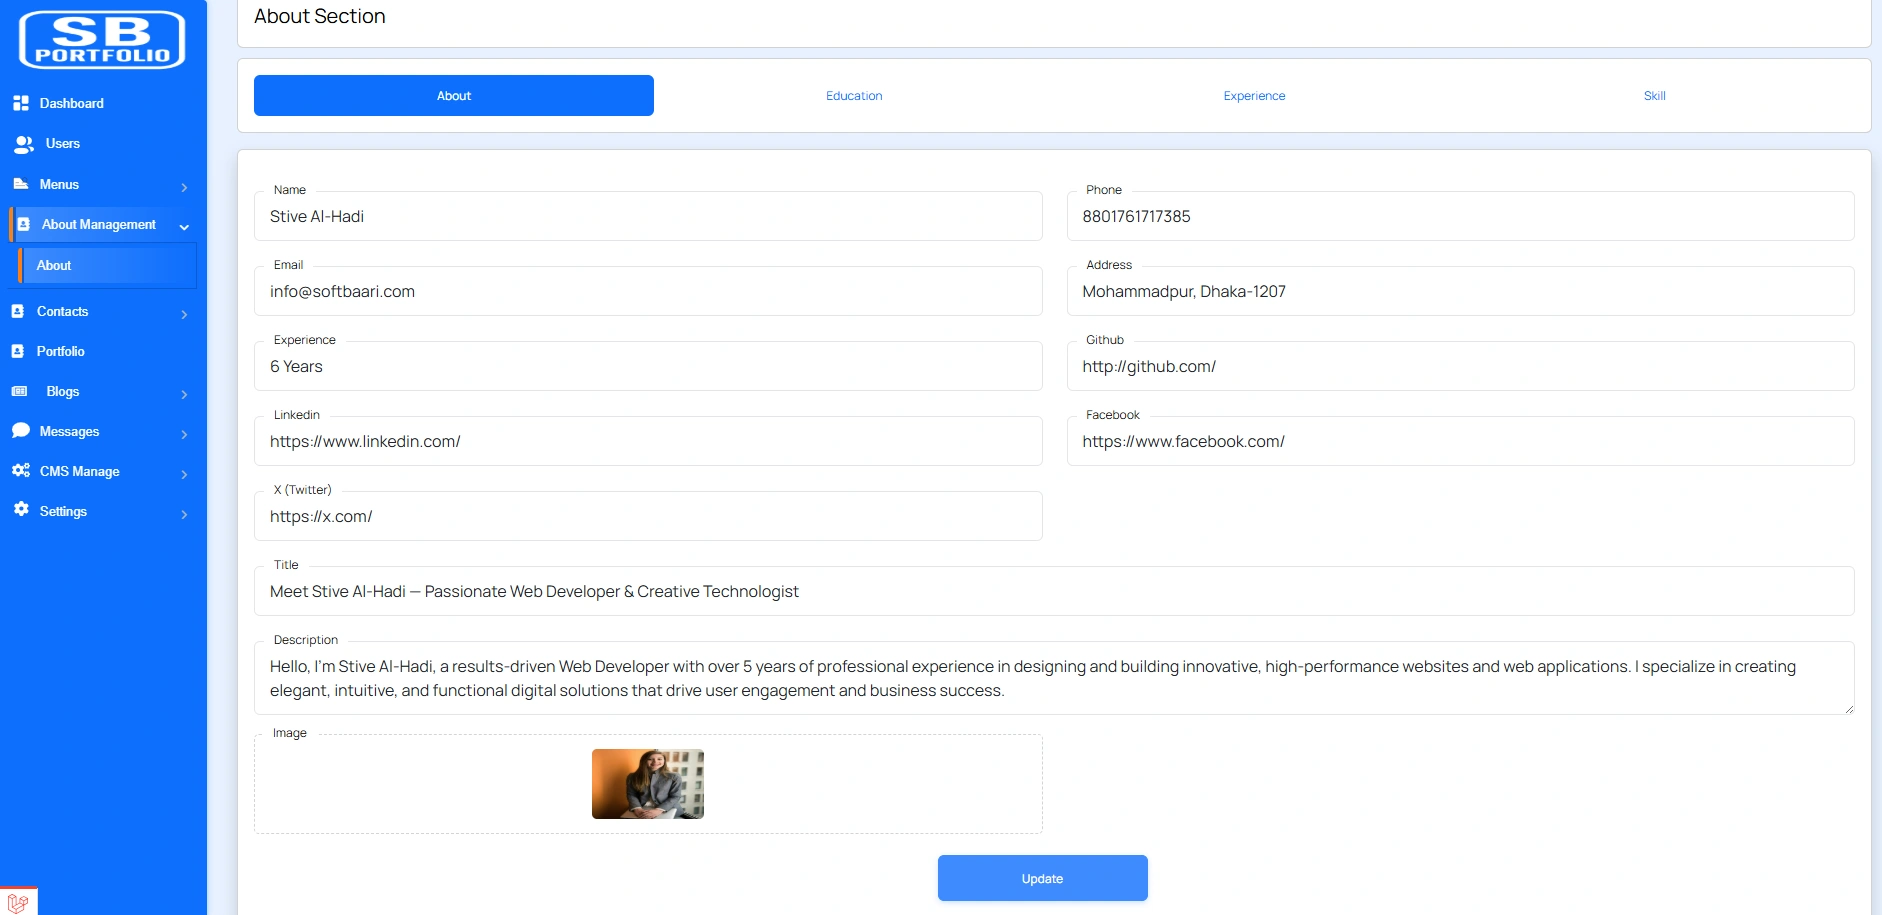
About Information
Here, This appears to be a screenshot of a contact information page. Here, you can upate about information
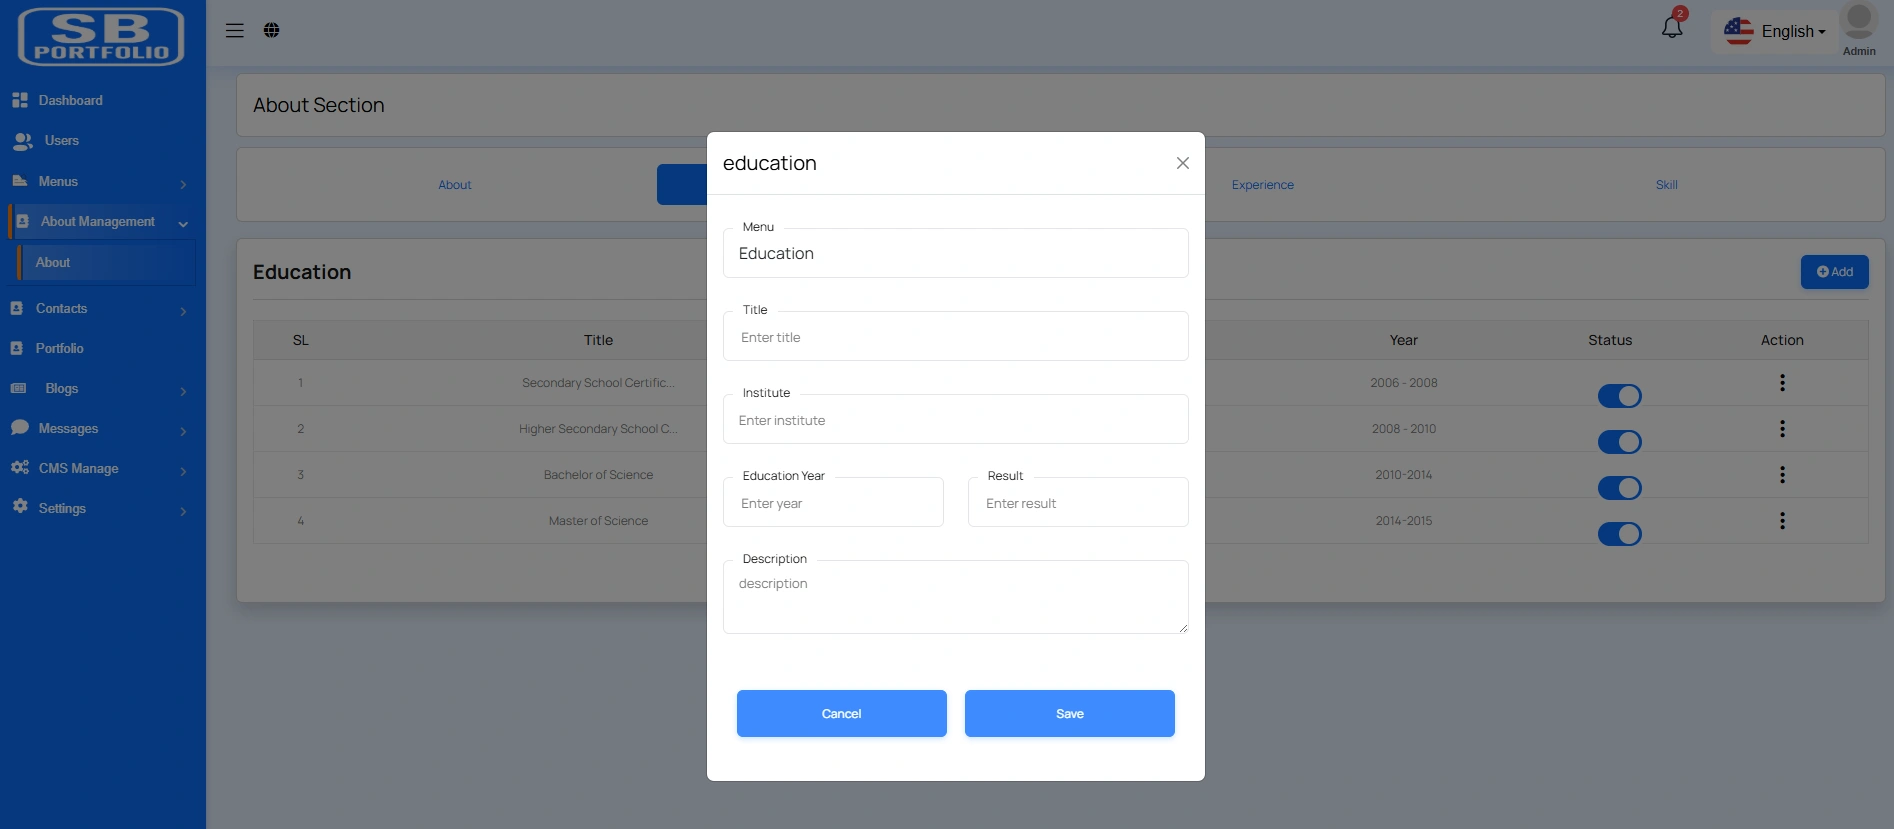
Create Education
By clicking on the "Education Tab" button, you can create a new education. You will need to fill in the necessary fields. Here is the screenshot of the create Education page.
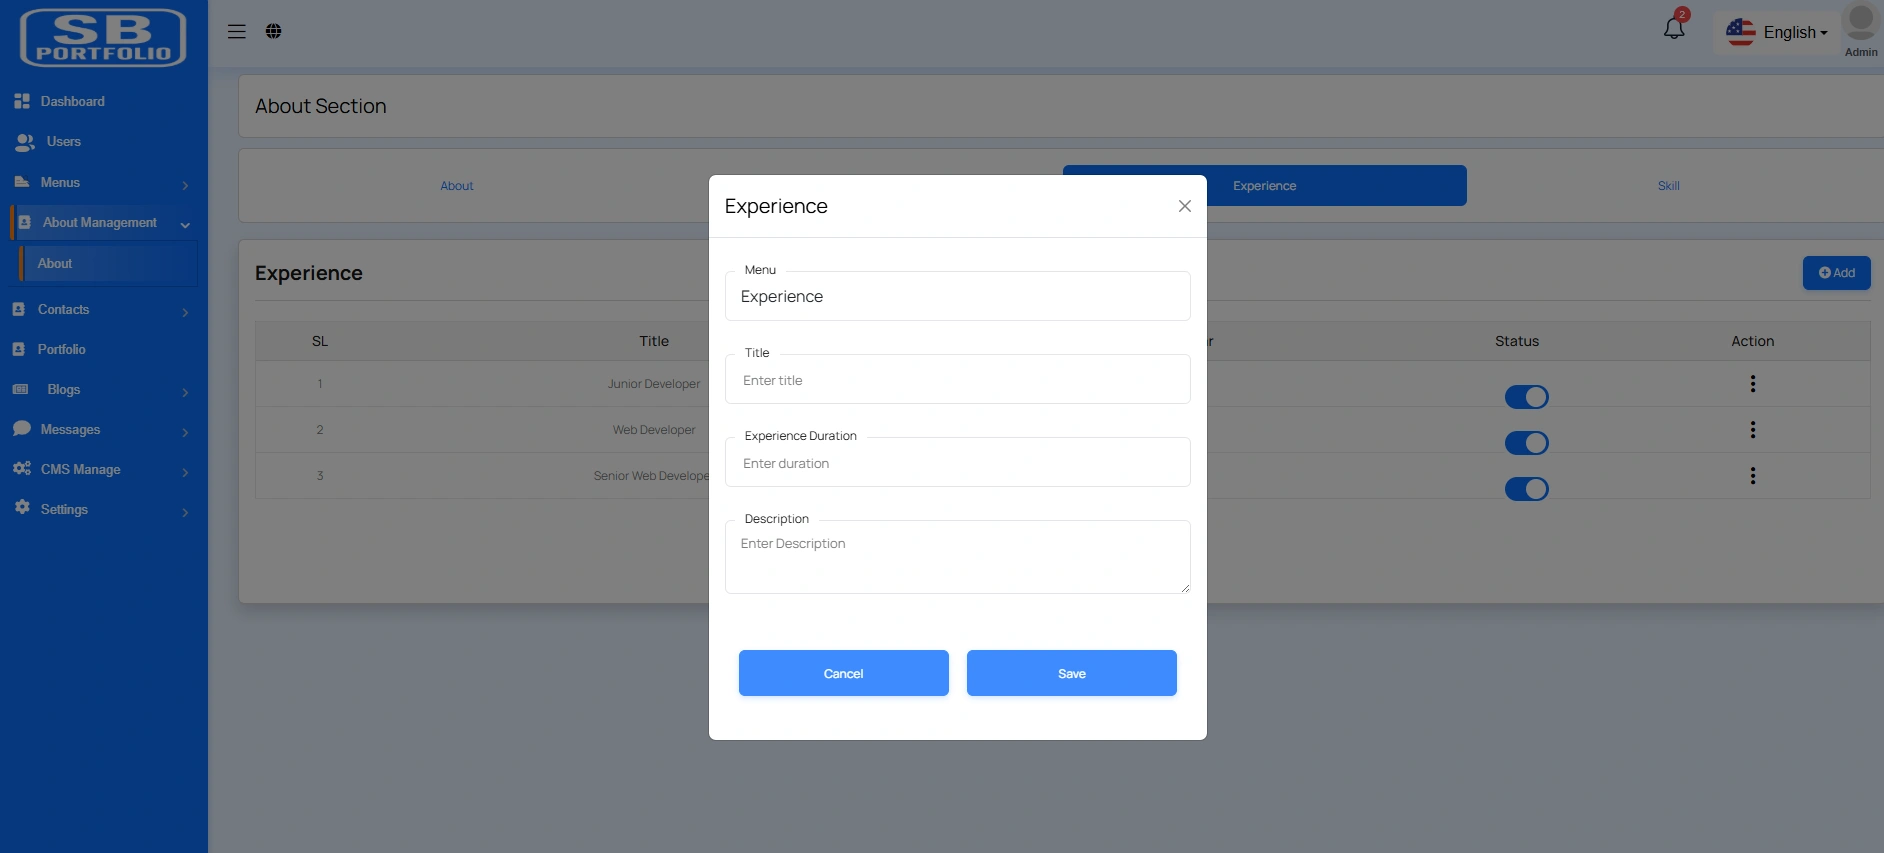
Create Experience
By clicking on the "Experience Tab" button, you can create a new experience. You will need to fill in the necessary fields. Here is the screenshot of the create experience page.
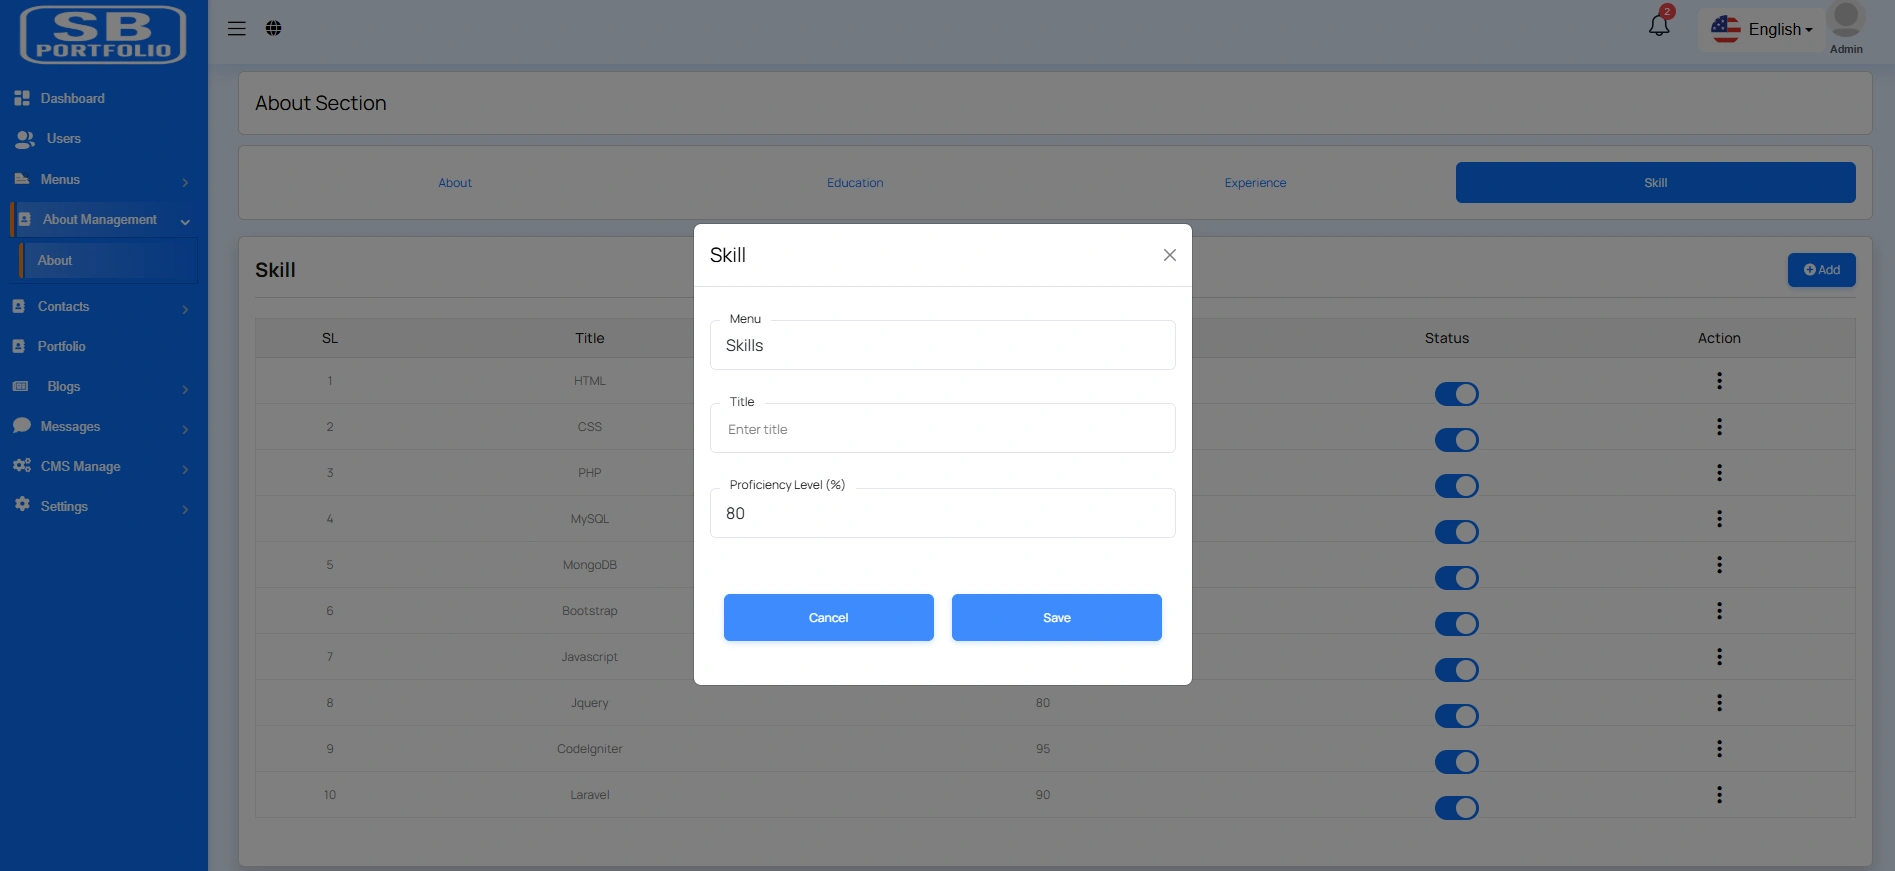
Create Skill
By clicking on the "Skill Tab" button, you can create a new skill. You will need to fill in the necessary fields. Here is the screenshot of the create skill page.
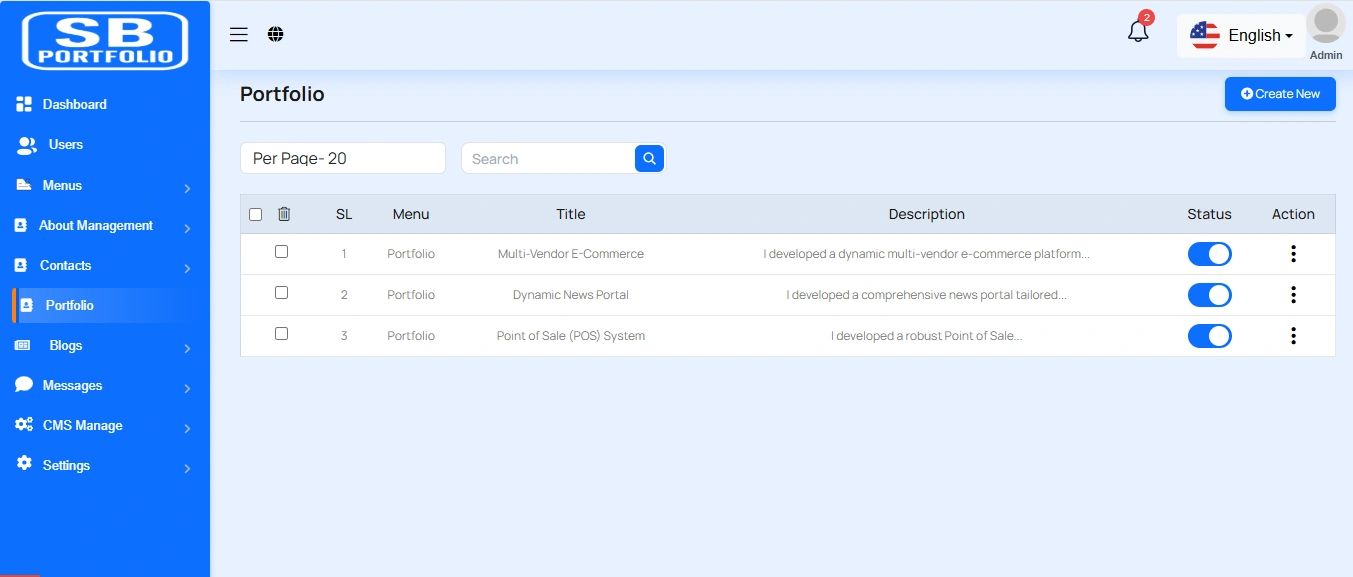
Portfolio List
Here, you can view the list of portfolios with a search filter. Additionally, you have the option to edit, delete individual entries, and perform multi-delete operations.
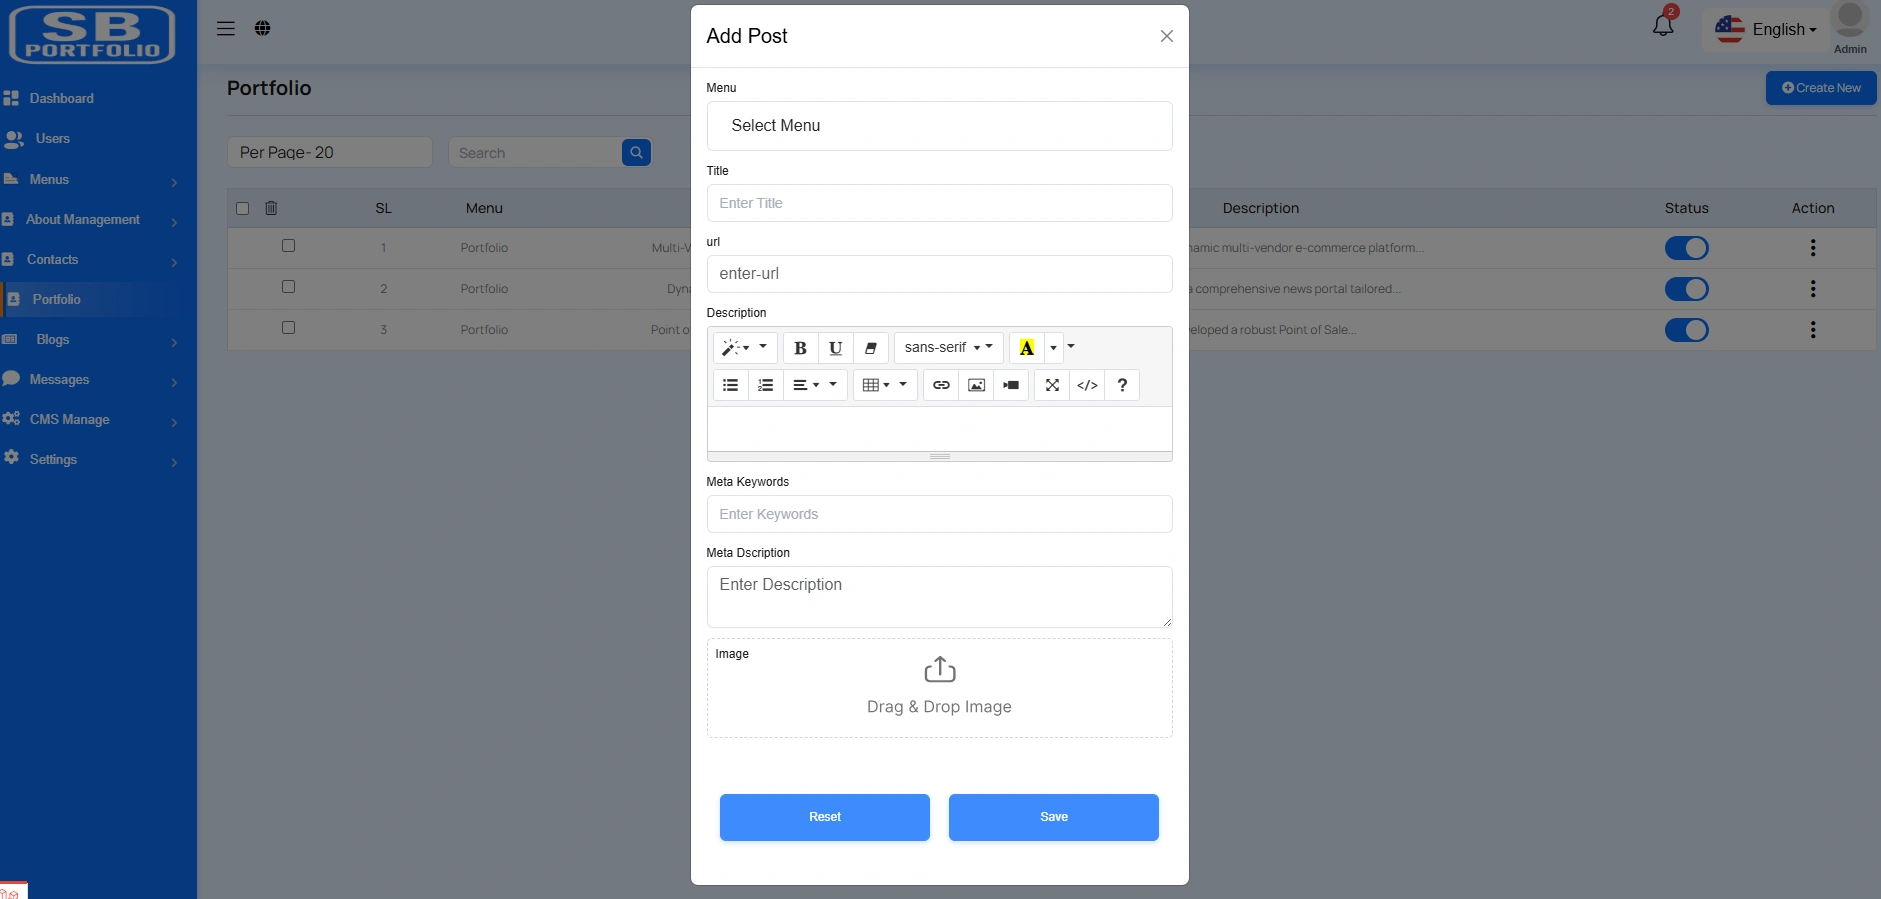
Create Portfolio
By clicking on the "Create New" button, you can create a new portfolio. You will need to fill in the necessary fields. Here is the screenshot of the create portfolio page.
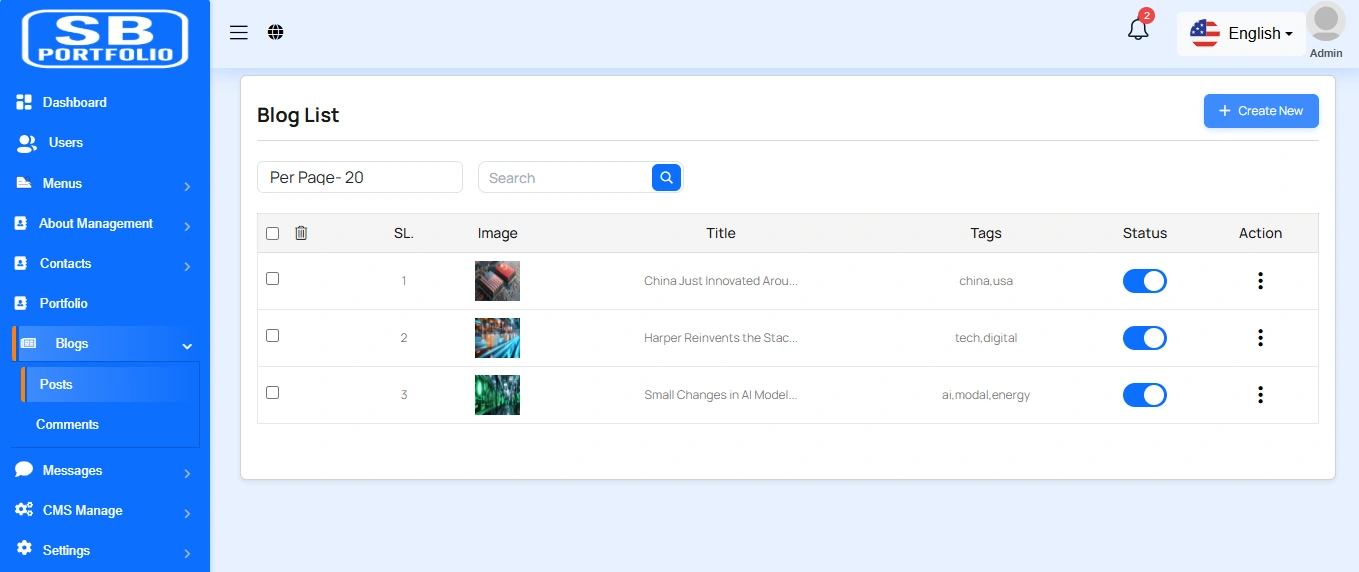
Blog List
Here, you can view the list of blogs with a search filter. Additionally, you have the option to edit, delete individual entries, and perform multi-delete operations.
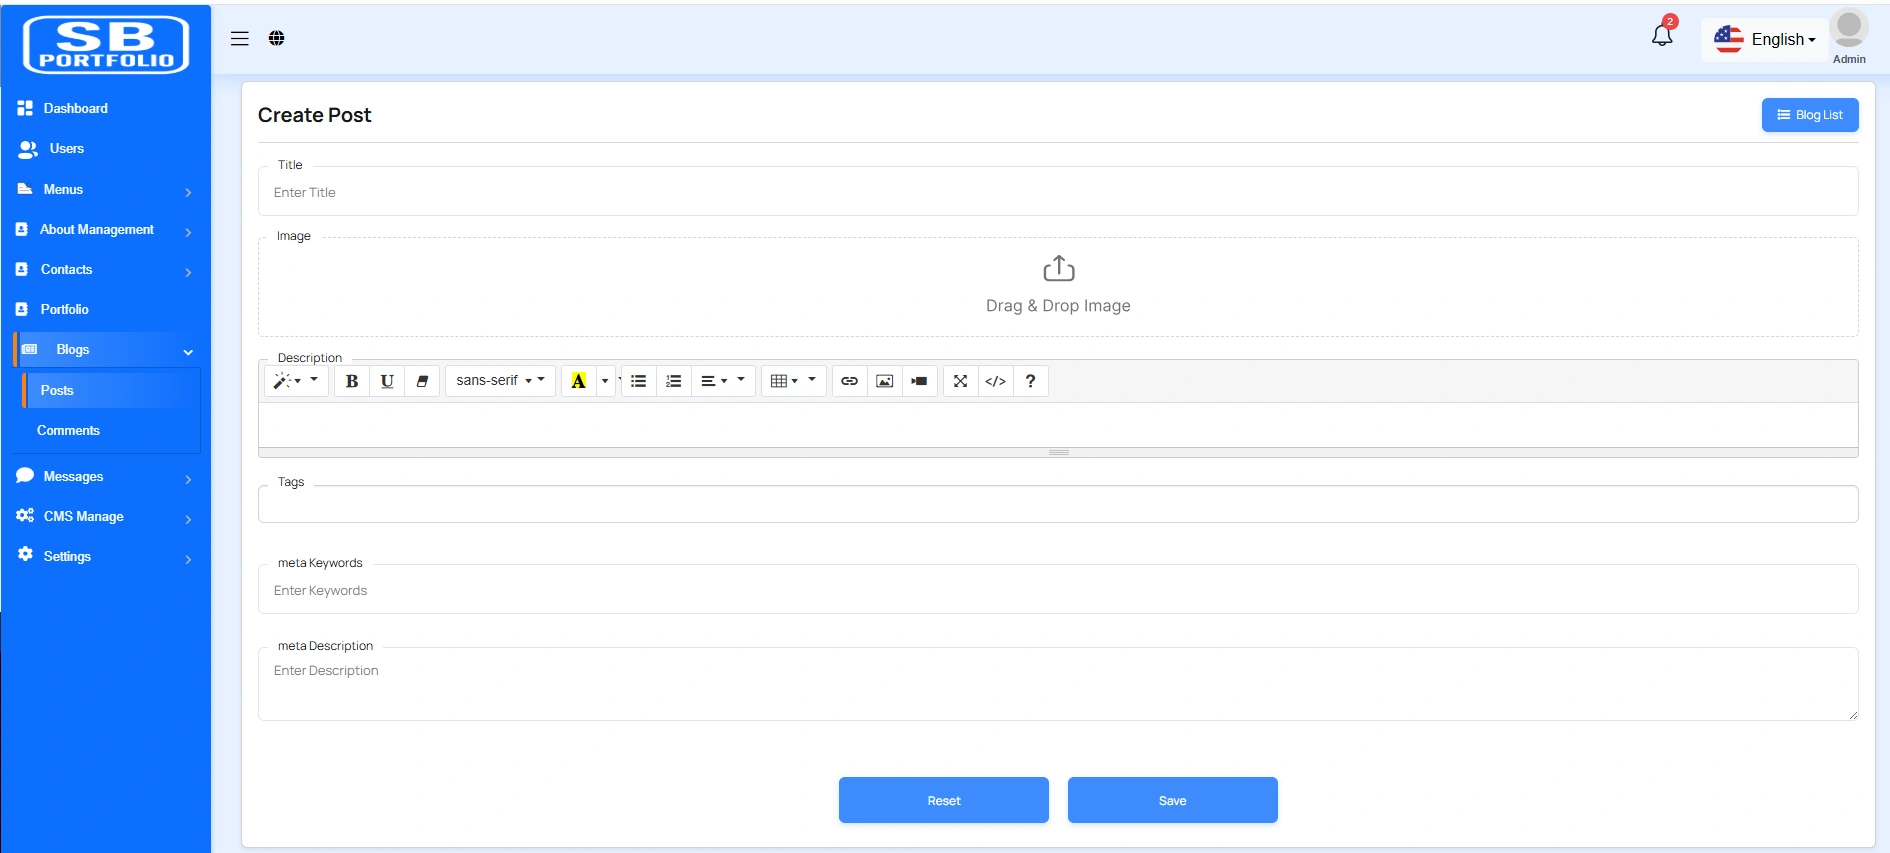
Create Blog
By clicking on the "Create New" button, you can create a new blog. You will need to fill in the necessary fields. Here is the screenshot of the create blog page.
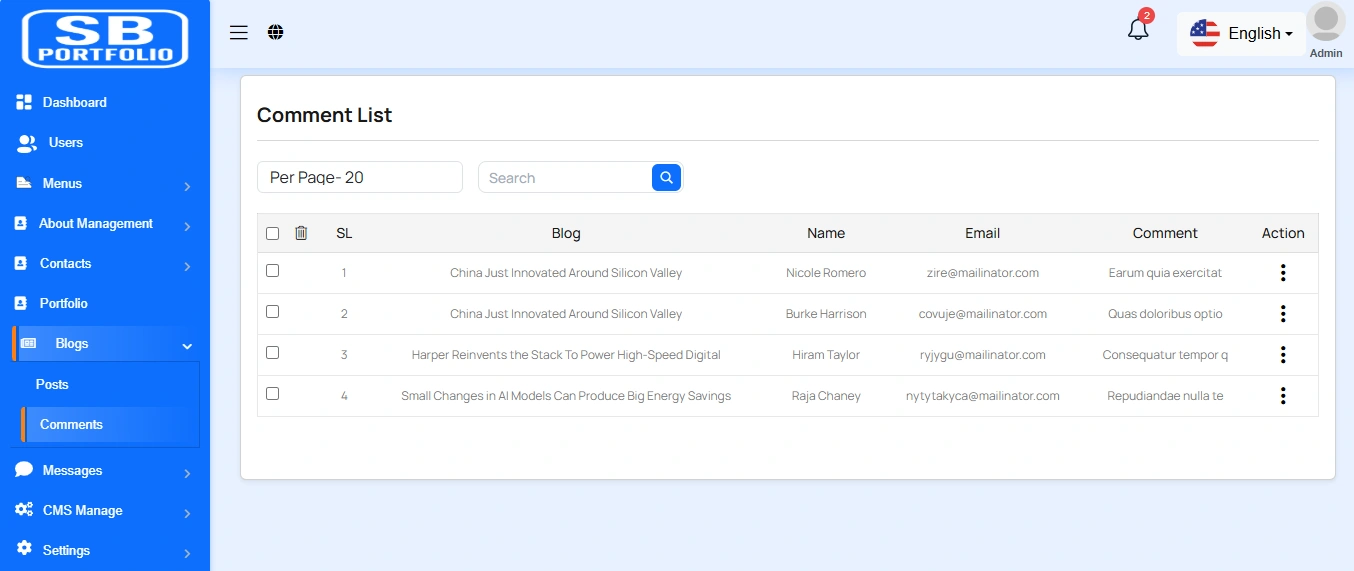
Comment List
Here, you can view the list of blogs comment with a search filter. Additionally, you have the option to edit, delete individual entries, and perform multi-delete operations.
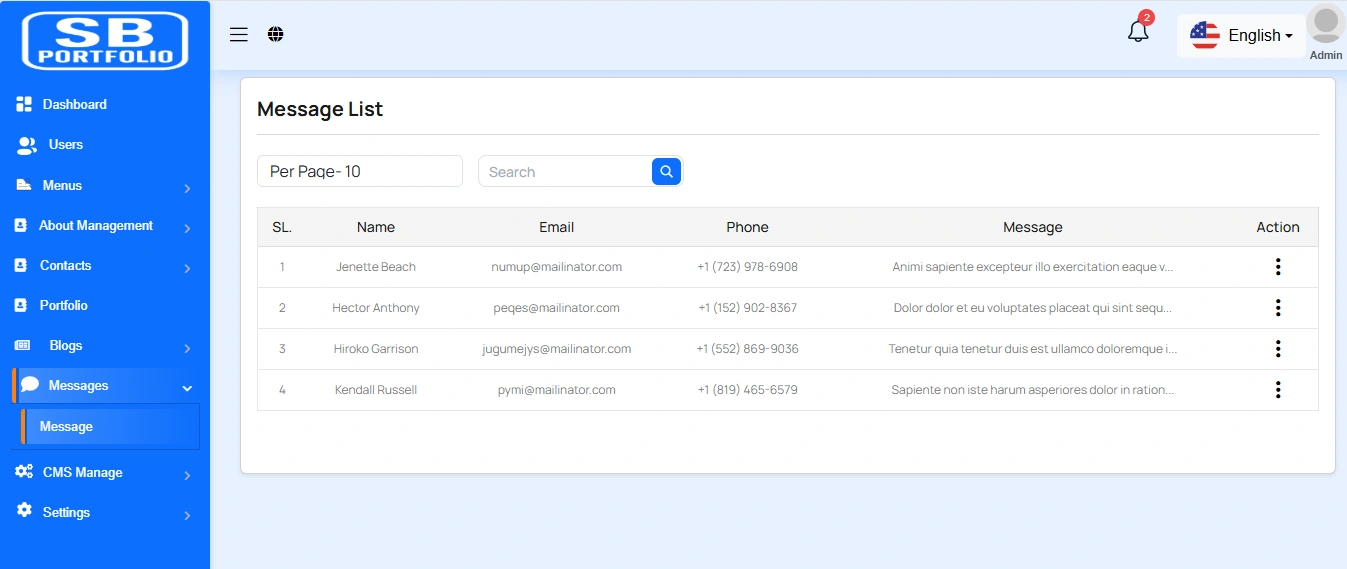
Message List
Here you can view messages sent to users from the website. You can filter messages and use options to delete or delete multiple messages simultaneously.
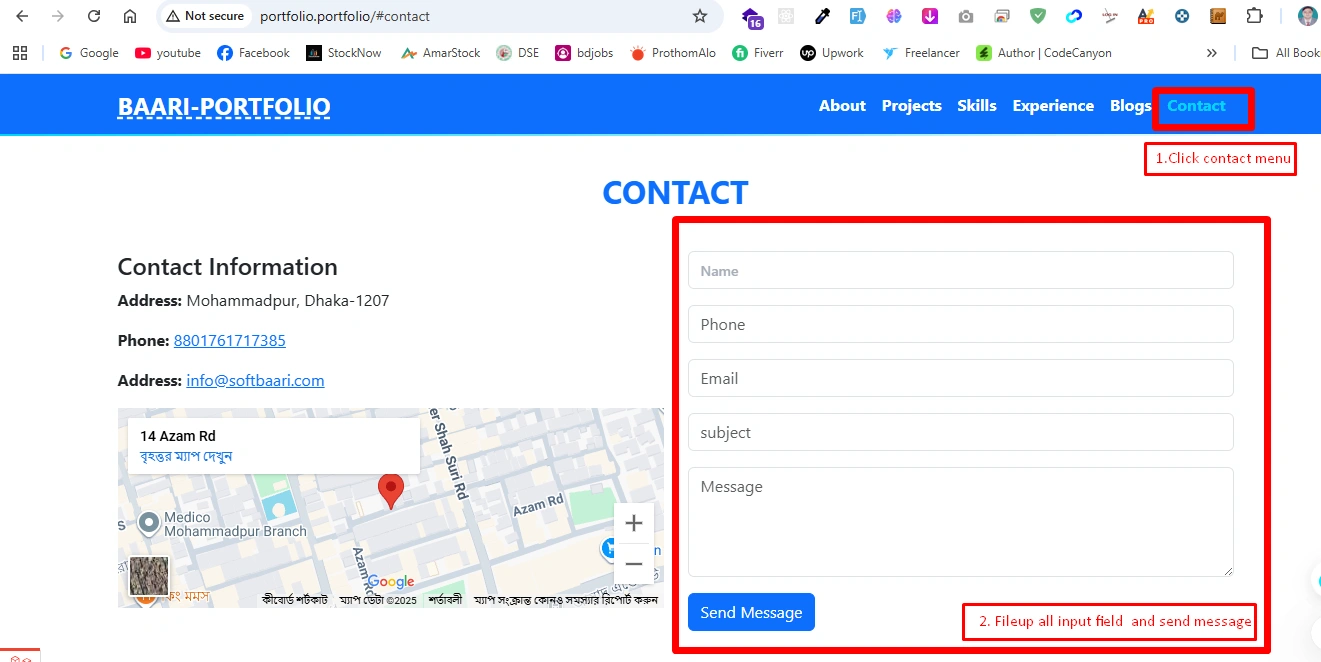
Create Message
You can create a message here by filling out the necessary fields. You will need to enter the contact name, email, phone number, subject and message. Once you have completed filling out the form, simply click the "Send Message" button..
CMS Manage
Here you have the ability to perform various actions including handling Pages, Terms & Condition, Privacy & Policy, FAQs, Testimonials, Features, Interface and Manage Blogs.
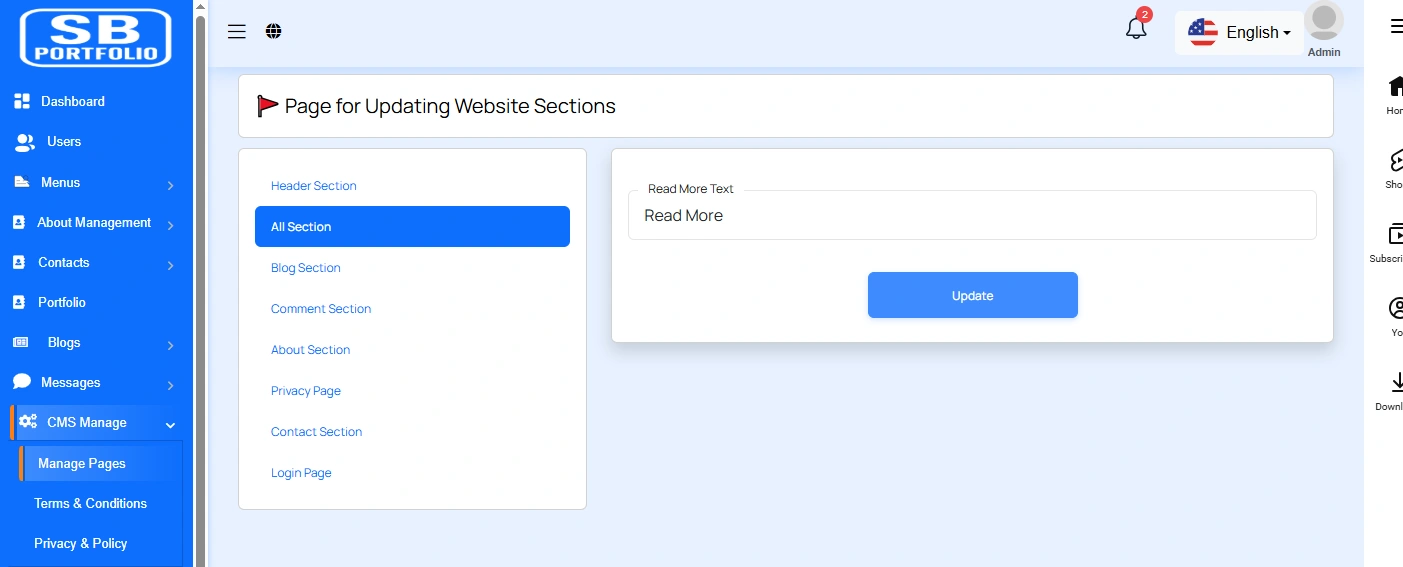
Manage Pages
You can modify various sections of the pages, including the slider,header,features, interface, watch, testimonial, blog, about us contuct us, pricing, footer, socila media.
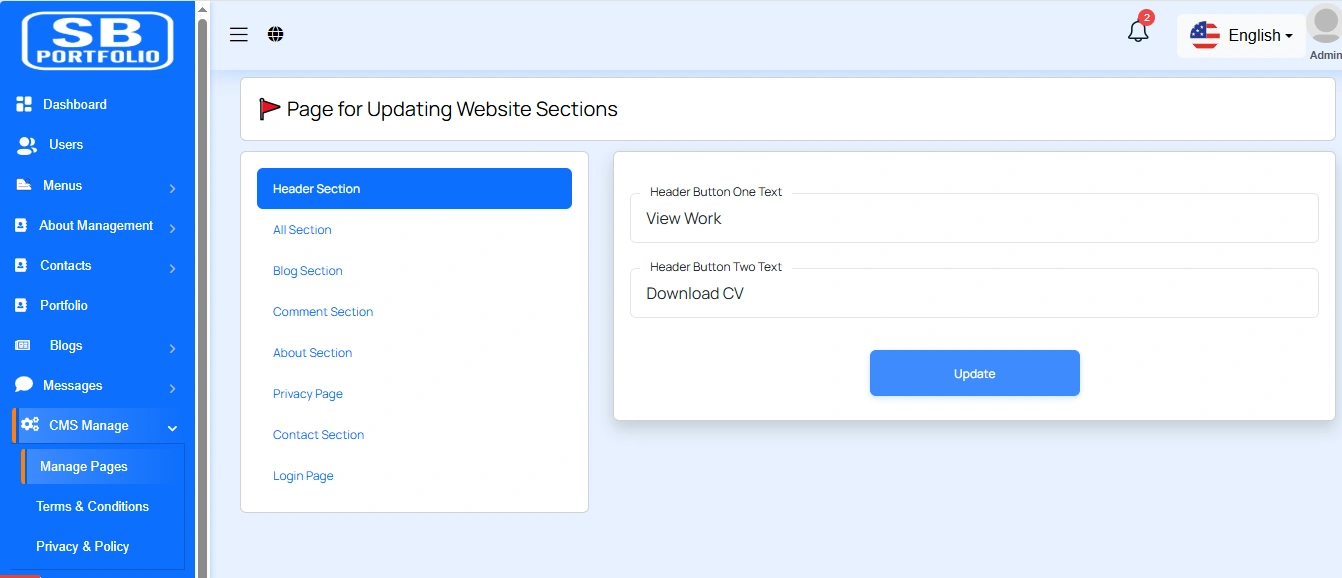
You can update the header "button" and its link of your landing page.
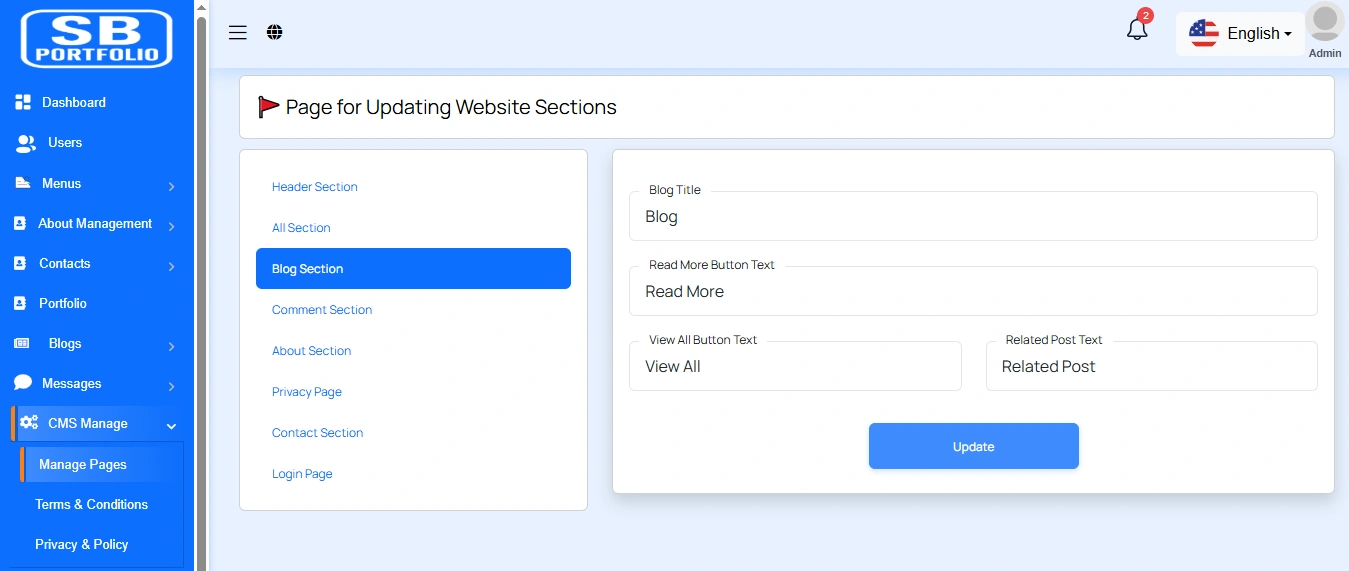
Here, you can update some information of your Blog page.
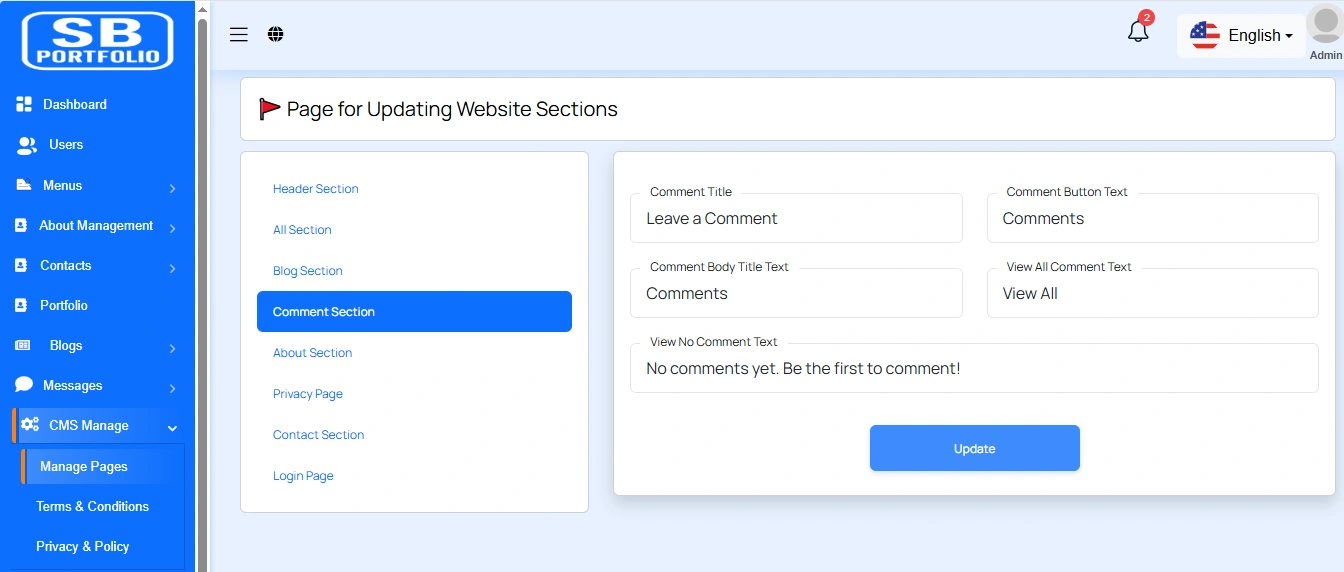
Here, you can update the comment title, button of the Blog page.
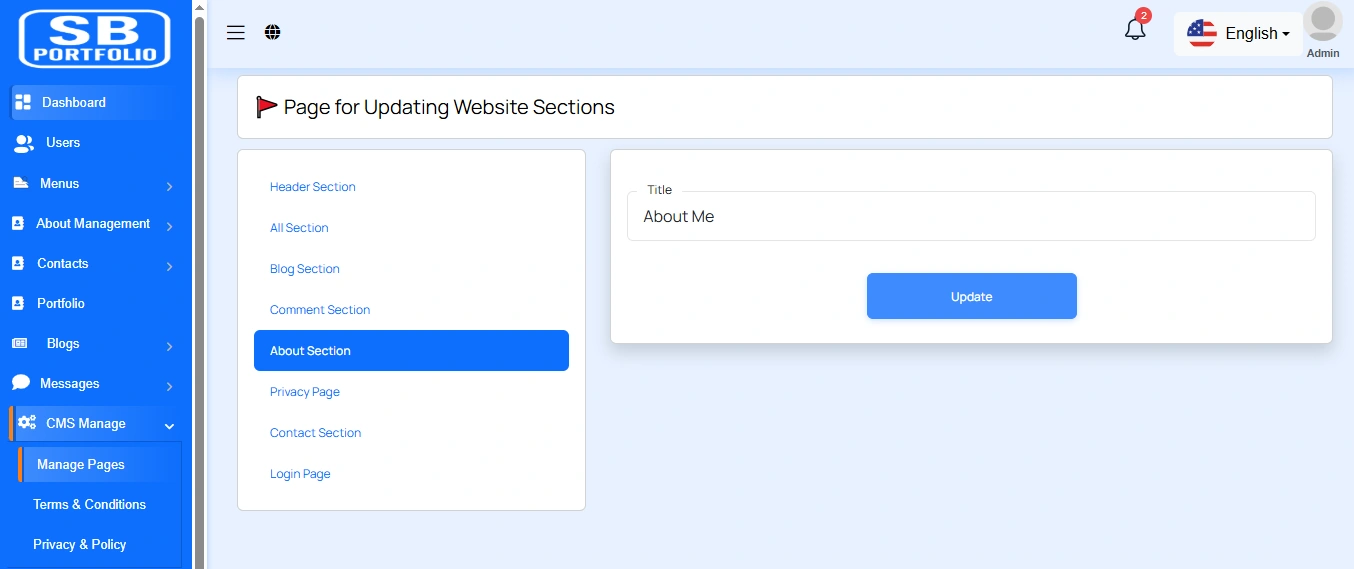
Here, you can update the about title of the About Page.
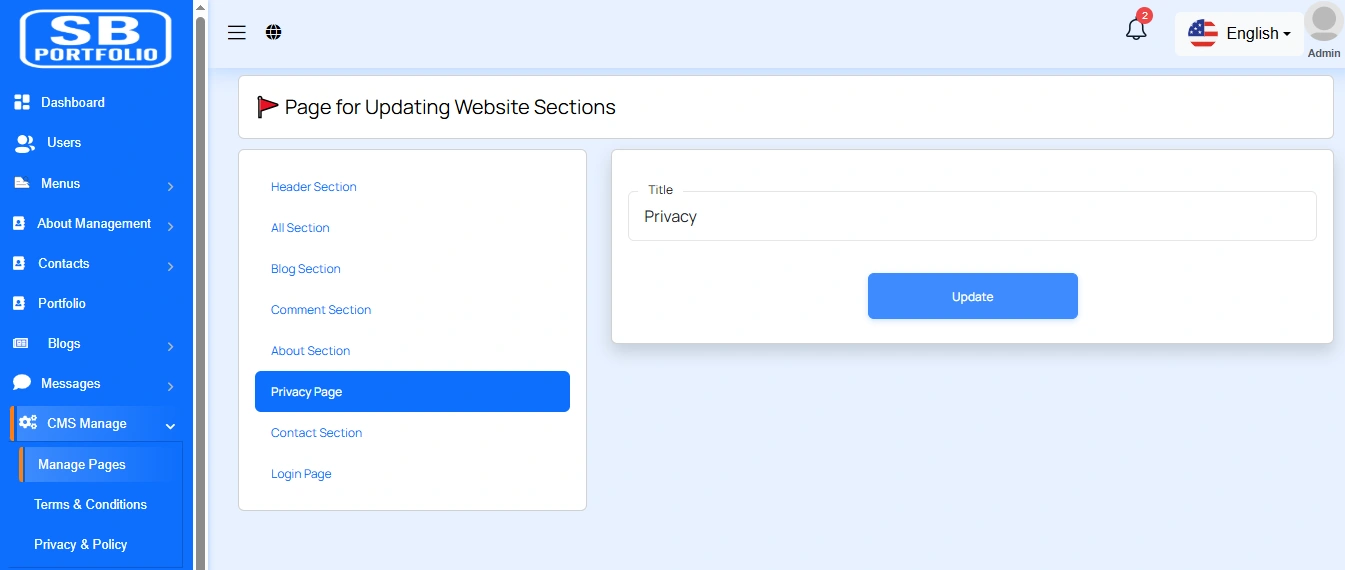
Here, you can update the about title of the Privacy Page.
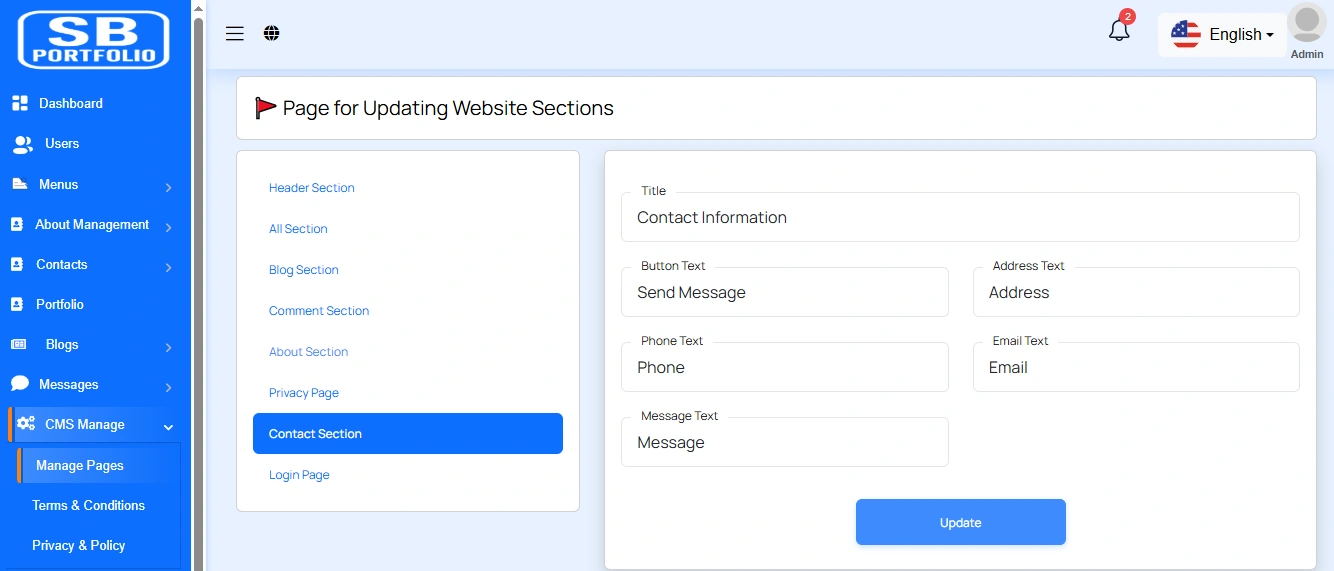
Here, you can update the contact section's title and form text of the Home page.
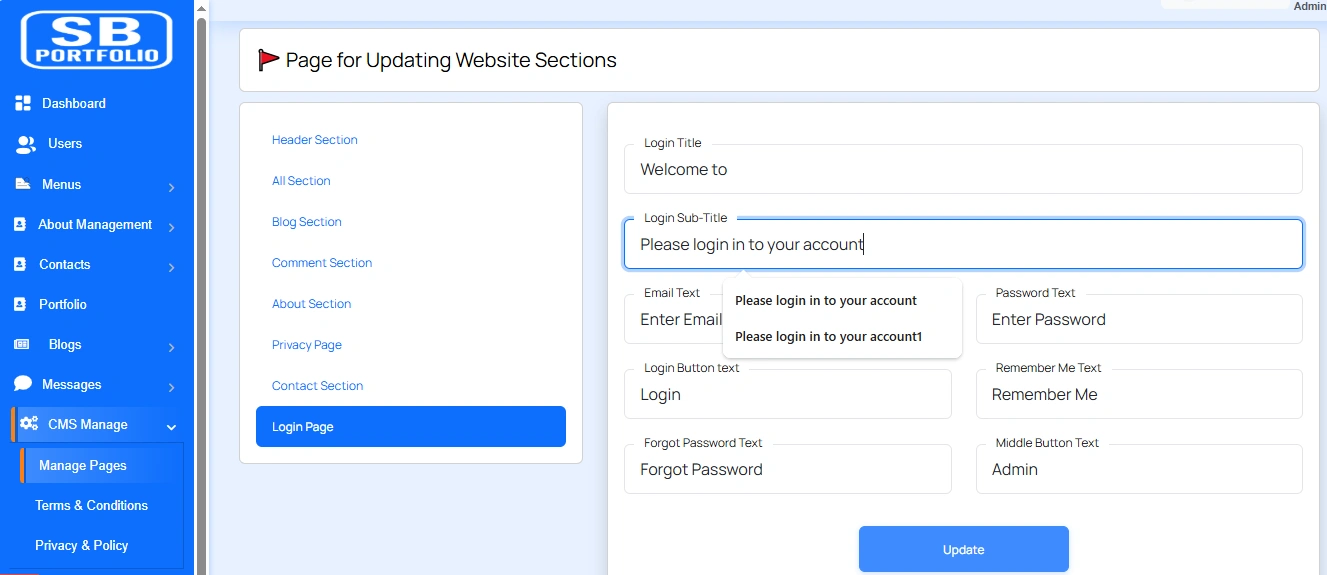
Here, you can update information of your Login page,Forget Password page.
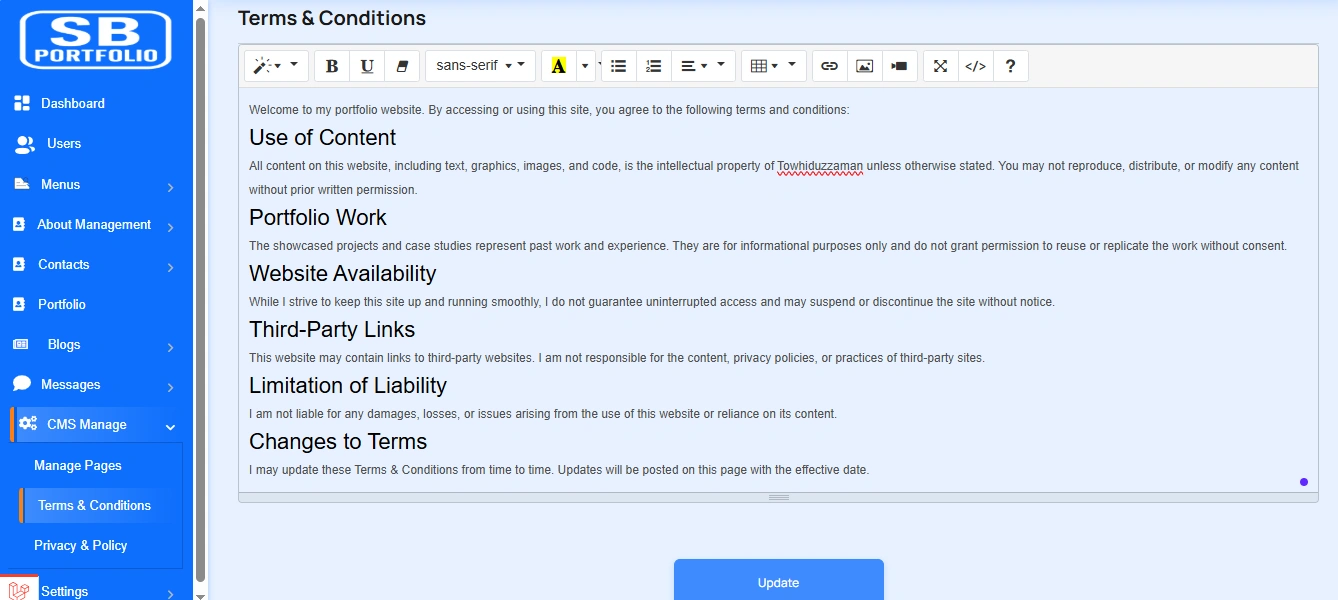
Term & Condition
Here are the updated terms and conditions for your software.
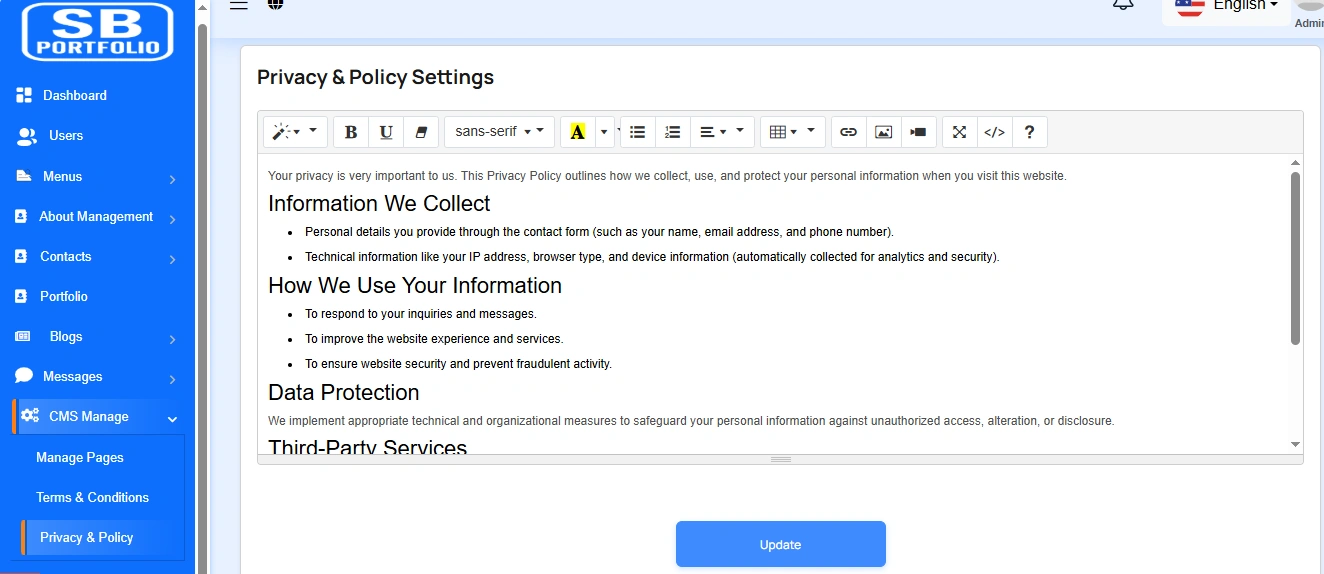
Privacy & Policy
We need a privacy policy for our software. You can update the policy in this section.
Setting
In the Setting section, you have the capability to configure the fundamental aspects or core elements of this project.
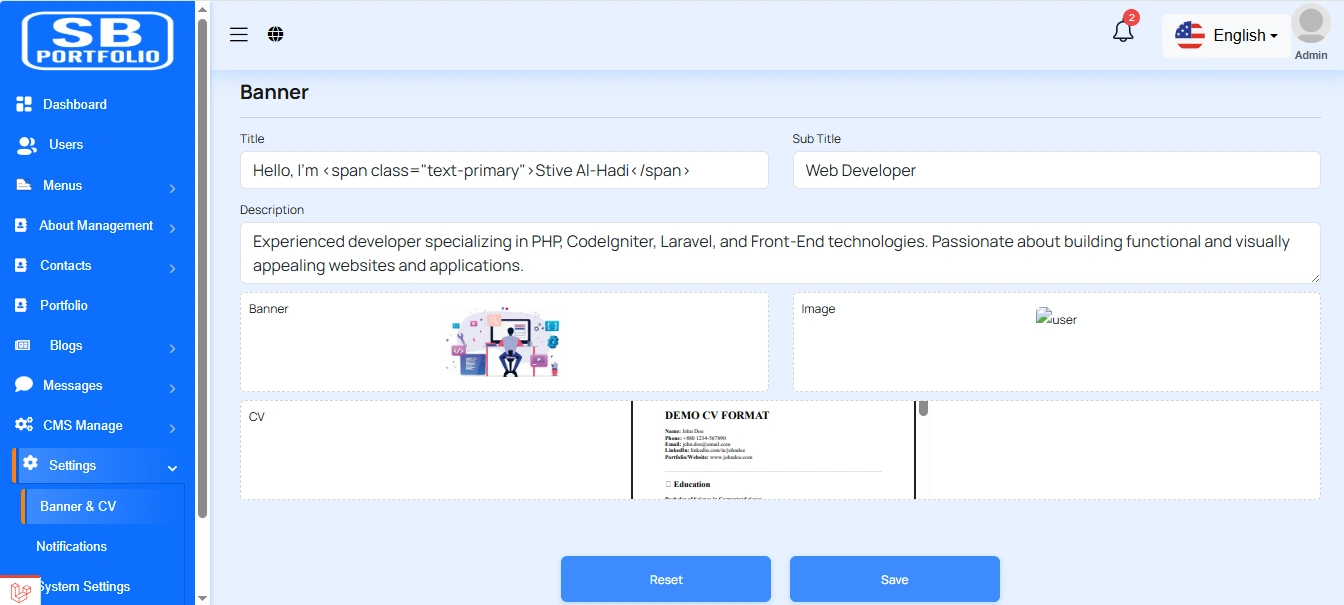
Banner & CV
You have the option to include banner and CV from this location.
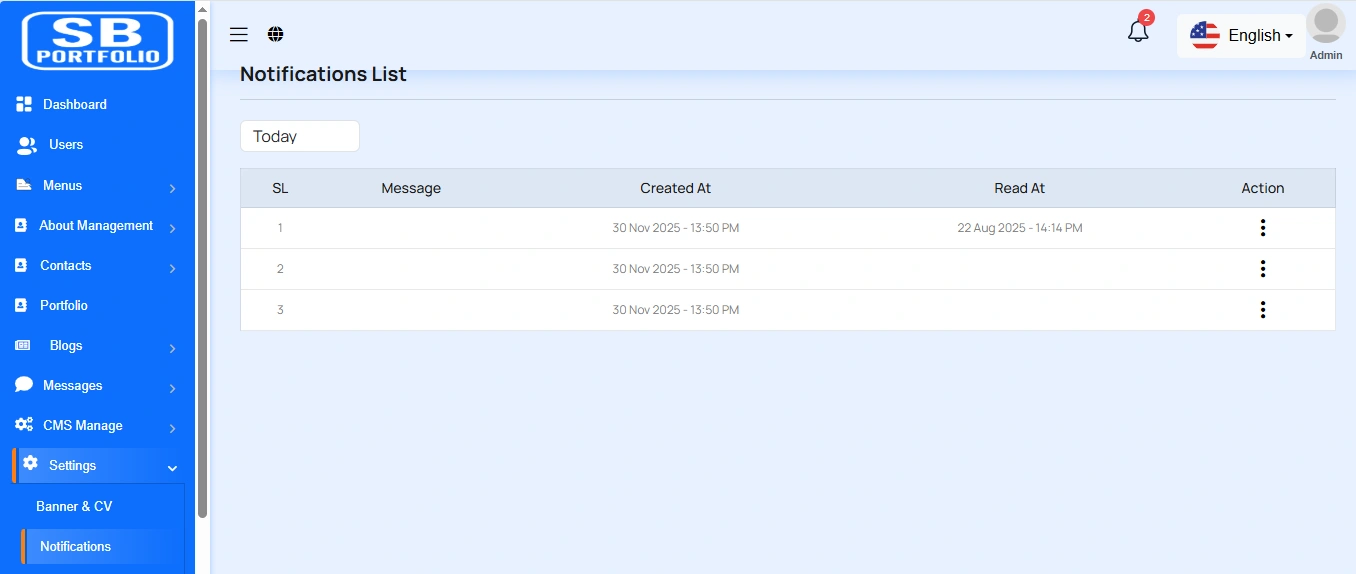
Notification
Here, you can view a list of various notifications. You also have the option to filter these notifications based on available criteria.In each list, clicking the "View" button allows you to see detailed information.
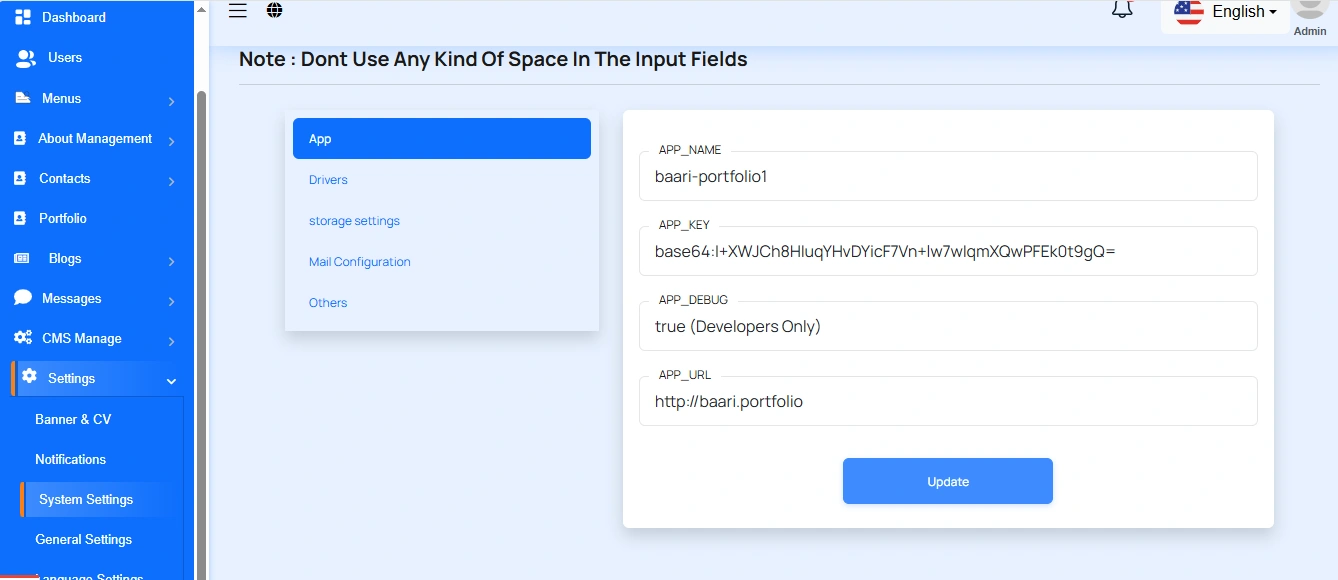
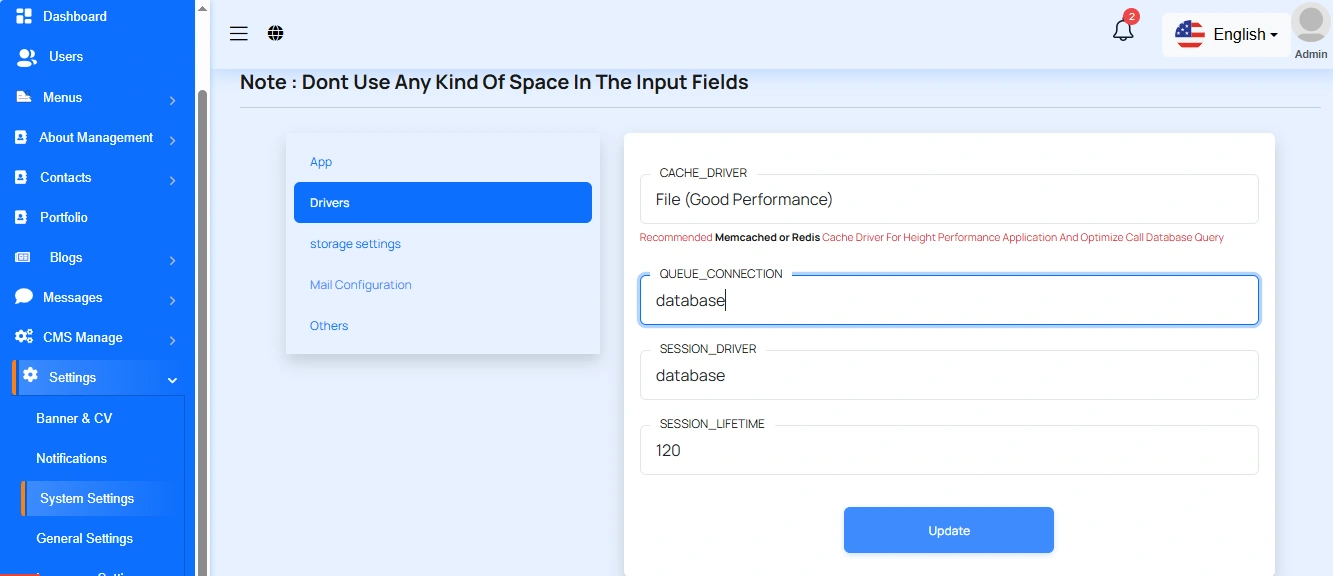
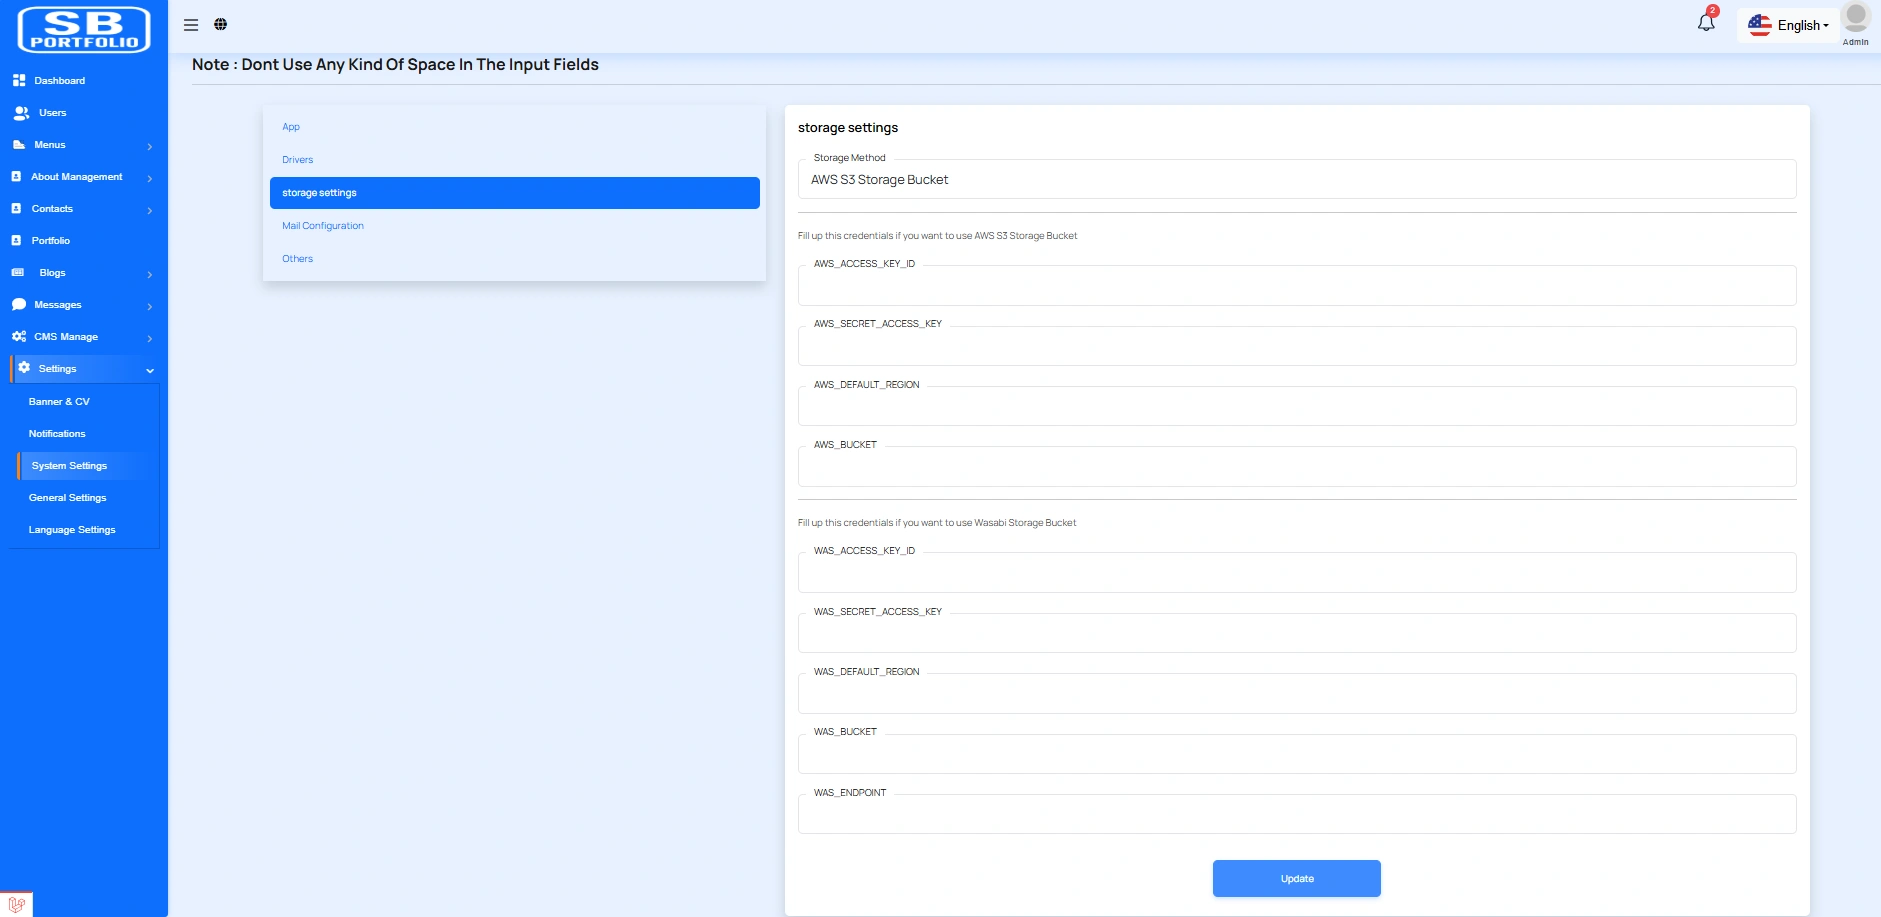
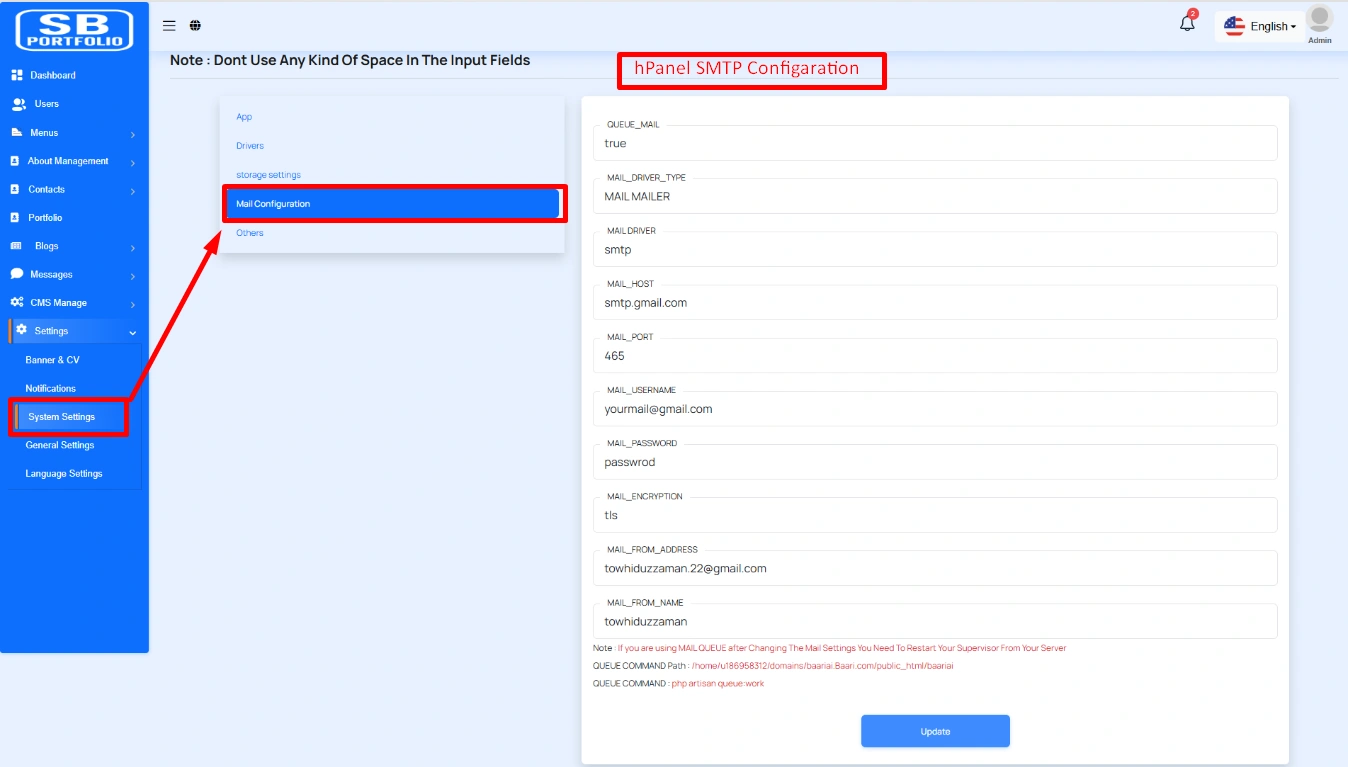
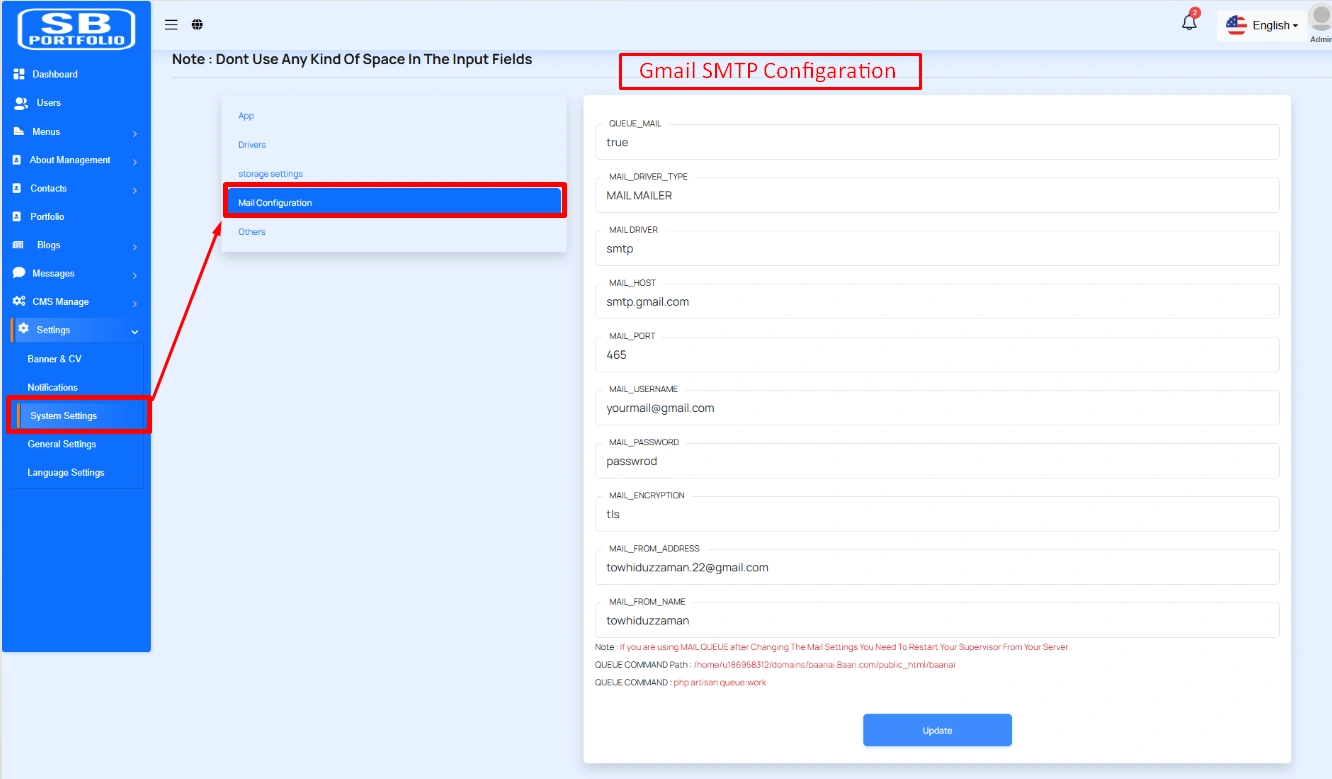
System Settings
In this section, you can configure various backend settings for the project, including application setup, driver configurations, mail settings, storage configurations, and other essential components. It's crucial to handle these configurations with care as they impact the functionality and security of the system.
App
Drivers
Storage Settings
Mail Configuration
Note: Please note that if you change QUEUE_MAIL from false to true, you need to run the following command: php artisan queue:work. Remember: The command path should be: /home/u186958312/domains/yourdomain.com/public_html. Make sure you're in the correct path.
Note: If you're not familiar with running the command, there's another option. Simply visit yourdomain.com/queue-work and it will be executed automatically.
Note: If you select QUEUE_MAIL as true but do not run the command or visit the URL, email functionality will not work properly.
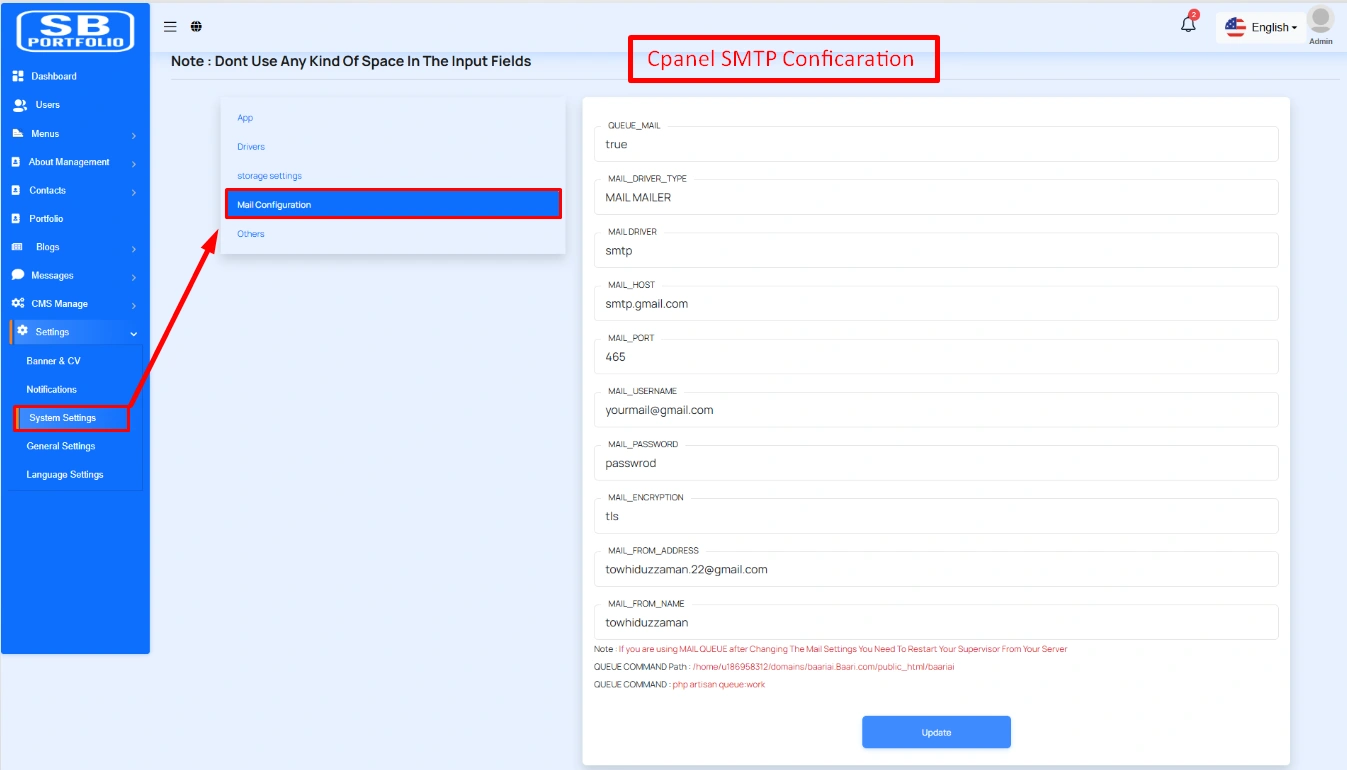
Mail Configuration / SMTP Setup
Cpanel
To create and configure an SMTP email account using cPanel, follow below steps:
Step 1: Log in to cPanel
Step 2: Create an Email Account
1. In cPanel, go to "Email Accounts".
2. Click “Create”.
3. Fill in:
a. Username: e.g., info, test, or hr
b. Domain: Select the correct domain (if multiple are available)
c. Password: Set a strong password or use the generator
4. Click Create.
📌 This creates an email like test@yourdomain.com
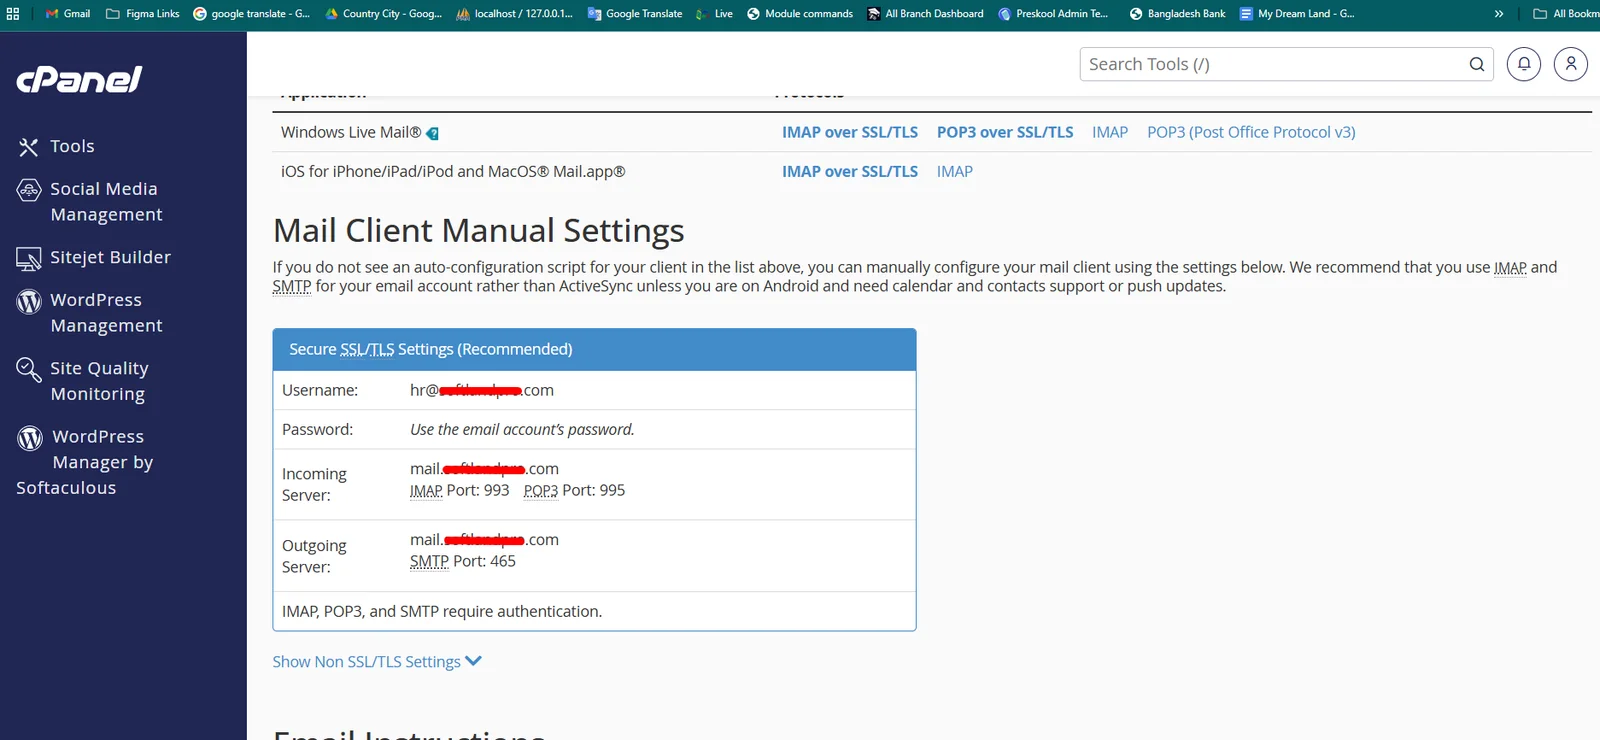
Step 3: Get SMTP Settings
Once the email is created:
1. Go to "Email Accounts" again.
2. Find your new email and click “Connect Devices”.
3. You’ll see the SMTP settings under the Mail Client Manual Settings section like below image:
Example:
| Input | Value |
|---|---|
| QUEUE_MAIL | Select true / false, (If you select true, you need to run the following command: php artisan queue:work on server) |
| MAIL_DRIVER_TYPE | Select MAIL MAILER / MAIL DRIVER |
| MAIL_DRIVER |
Use sendmail if your server has a local mail server installed (like Postfix
or Exim).
Use smtp when sending emails through an external mail service (like Gmail, Mailgun, or your hosting provider's SMTP server). |
| MAIL_HOST | mail.yourdomain.com |
| MAIL_PORT | 587 |
| MAIL_USERNAME | test@yourdomain.com |
| MAIL_PASSWORD | The one you set |
| MAIL_ENCRYPTION | tls |
| MAIL_FROM_ADDRESS | yourmail@gmail.com |
| MAIL_FROM_NAME | Your project/app name |
Set the values to System Settings → Mail Configuration
If you want to know more details please follow their, Official documentation. Here is also a youtube video link for reference.
Hostinger Panel
To create and configure an SMTP email account using hostinger, follow below steps:
Step 1: Log In to Hostinger hPanel https://hpanel.hostinger.com
Step 2: Create an Email Account
1. Go to Emails from the top menu.
2. Select your domain name.
3. Click "Create New Email Account".
4. Fill in:
a. Email address (e.g., info, test, or hr)
b. Password
5. Click "Create".
📌 This creates an email like test@yourdomain.com
Step 3: Get SMTP Settings
1. After creating the email, go back to the Email Accounts section.
2. Find your email and click “Connect App & Devices” or “Set Up Devices”.
3. Look for the Manual Configuration or SMTP Settings.
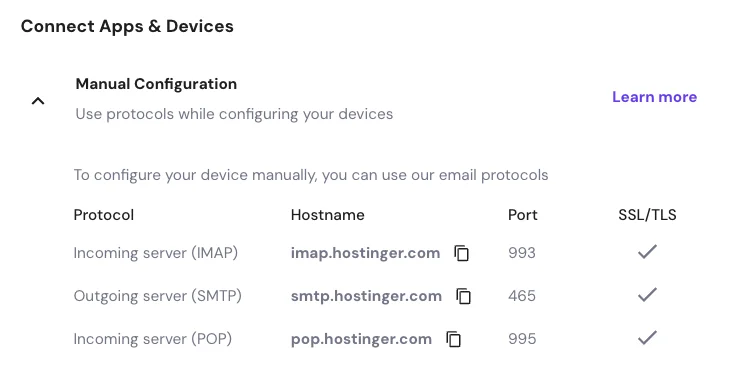
Example:
| Input | Value |
|---|---|
| QUEUE_MAIL | Select true / false, (If you select true, you need to run the following command: php artisan queue:work on server) |
| MAIL_DRIVER_TYPE | Select MAIL MAILER / MAIL DRIVER |
| MAIL_DRIVER |
Use sendmail if your server has a local mail server installed (like Postfix
or Exim).
Use smtp when sending emails through an external mail service (like Gmail, Mailgun, or your hosting provider's SMTP server). |
| MAIL_HOST | mail.yourdomain.com |
| MAIL_PORT | 465 |
| MAIL_USERNAME | test@yourdomain.com |
| MAIL_PASSWORD | The one you set |
| MAIL_ENCRYPTION | ssl |
| MAIL_FROM_ADDRESS | yourmail@gmail.com |
| MAIL_FROM_NAME | Your project/app name |
Set the values to System Settings → Mail Configuration
If you want to know more details please follow their, Official documentation. Here is also a youtube video link for reference.
Note: Please note that if you change QUEUE_MAIL from false to true,
you need to run the following command: php artisan queue:work.
Remember: The command path should be:
/home/u186958312/domains/yourdomain.com/public_html. Make sure you're in the
correct path.
Note: If you're not familiar with running the command, there's
another option. Simply visit yourdomain.com/queue-work and it will be executed
automatically.
Note: If you select QUEUE_MAIL as true but do not run the command or visit the URL, email functionality will not work properly.
Gmail
To create and configure an SMTP email account using Gmail, follow below steps:
Step 1: Enable 2-Step Verification on Google Account
1. Go to https://myaccount.google.com
2. Click "Security" from the left menu.
3. Under "Signing in to Google", enable 2-Step Verification.

4. Complete the setup with your phone or other options.
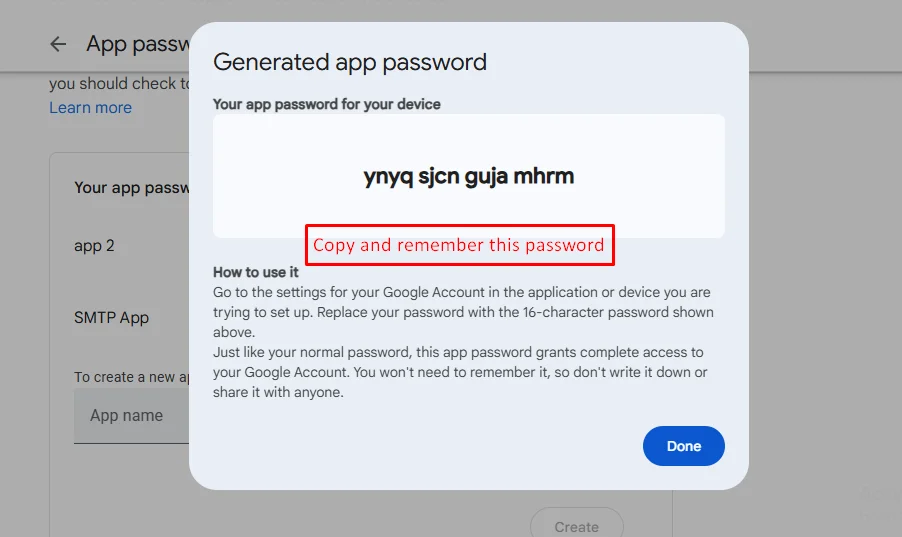
Step 2: Create an App Password
After enabling 2-Step Verification:
1. Visit: https://myaccount.google.com/apppasswords
2. Sign in if asked.
3. Under "Select the app", choose Other (Custom name).
4. Give it a name like "SMTP App" and click Generate.
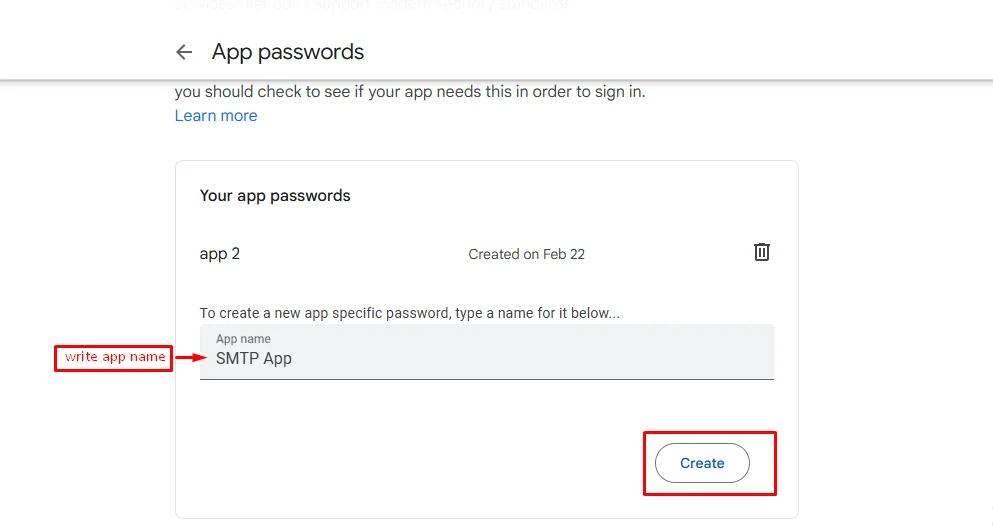
5. Google will show you a 16-character password — copy it. You’ll use this as your SMTP password
Example:
| Input | Value |
|---|---|
| QUEUE_MAIL | Select true / false, (If you select true, you need to run the following command: php artisan queue:work on server) |
| MAIL_DRIVER_TYPE | Select MAIL MAILER / MAIL DRIVER |
| MAIL_DRIVER | smtp |
| MAIL_HOST | smtp.gmail.com |
| MAIL_PORT | 587 |
| MAIL_USERNAME | your_email@gmail.com |
| MAIL_PASSWORD | your_app_password |
| MAIL_ENCRYPTION | tls |
| MAIL_FROM_ADDRESS | your_email@gmail.com |
| MAIL_FROM_NAME | Your project/app name |
Set the values to System Settings → Mail Configuration
If you want to know more details please follow their, Official documentation. Here is also a youtube video link for reference.
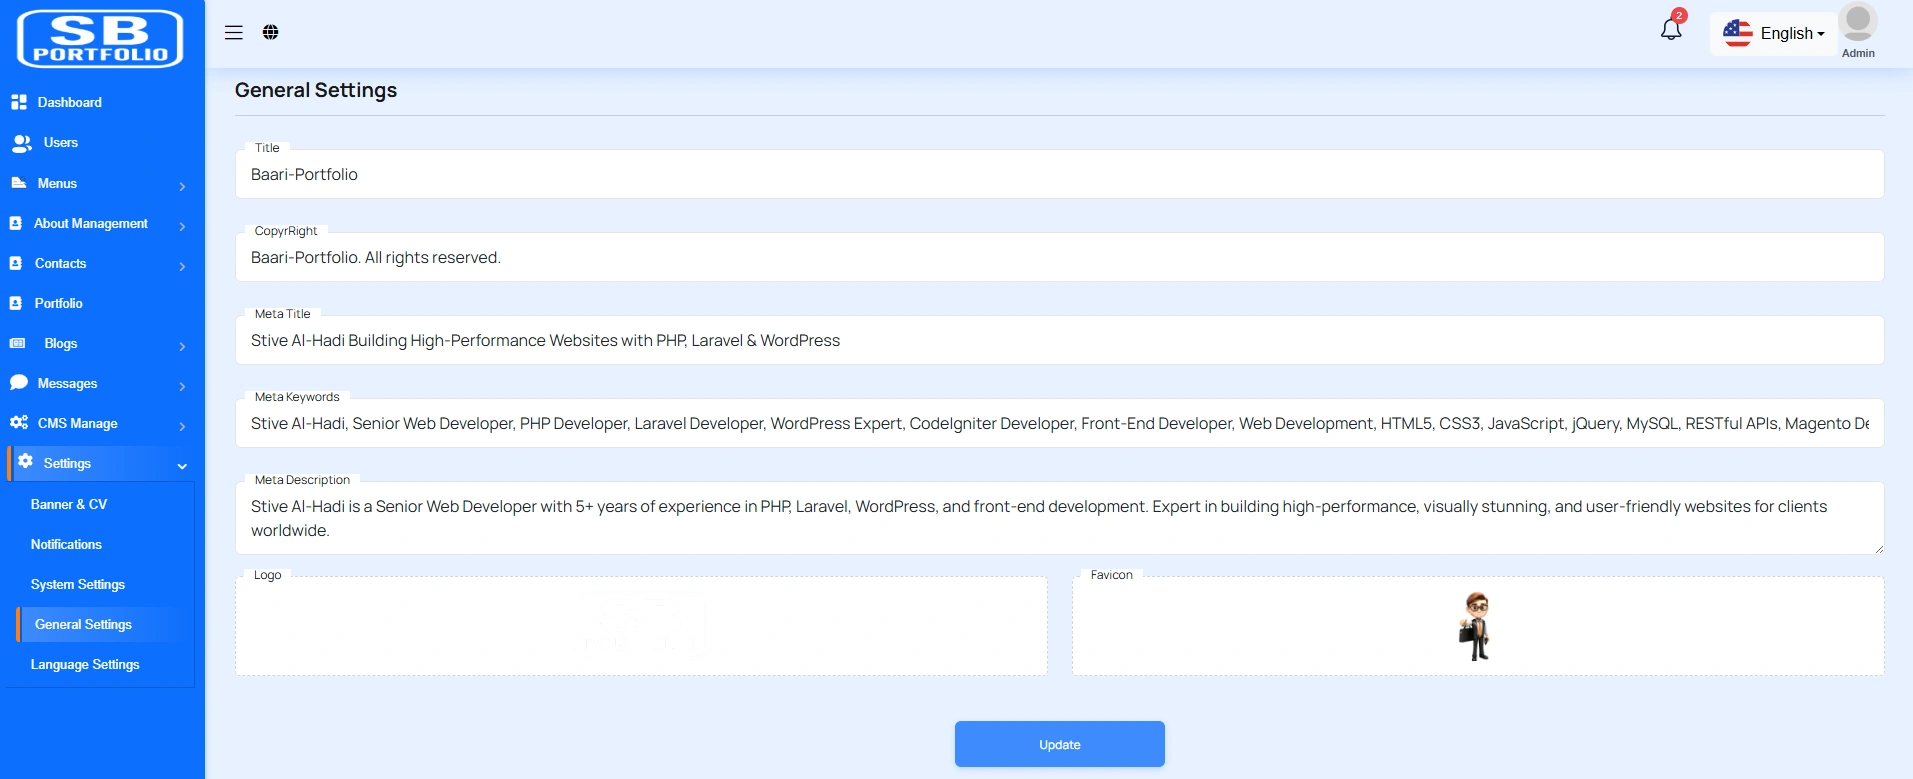
General Settings
You have the capability to modify the general project information.
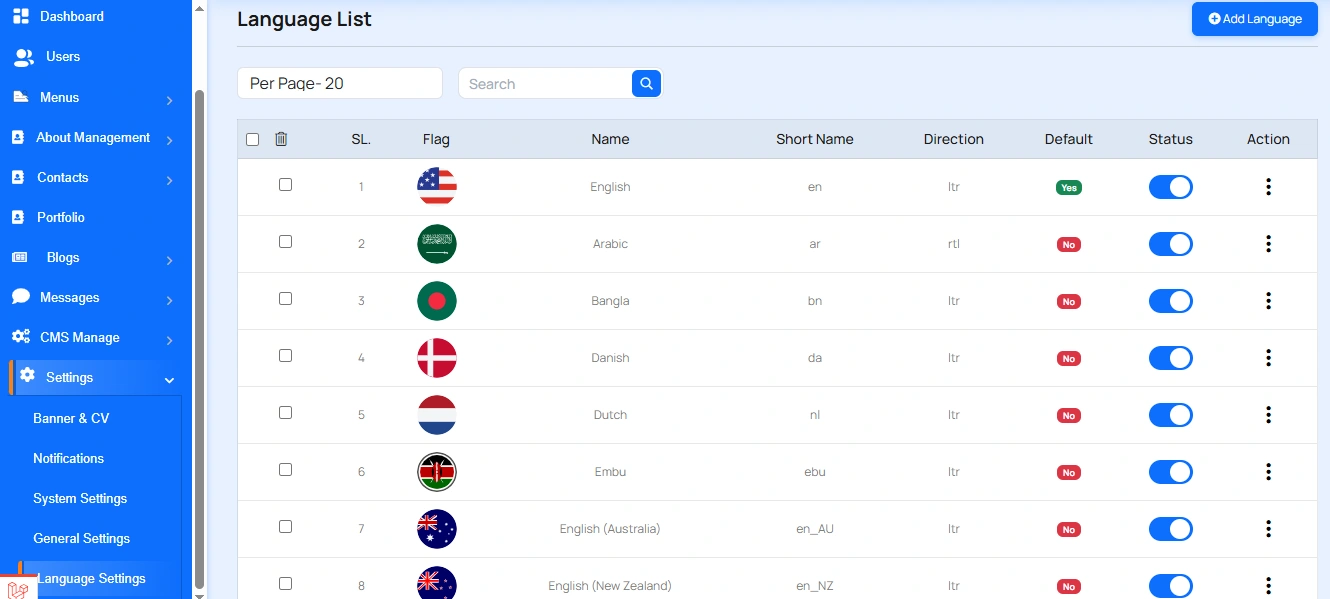
Create Language
You have the option to include languages from this location.
Admin Change Logs & Update Guide
Note: Before updating to the new version, please ensure you have a database and full project backup, and that your project is already updated to the latest version. This is extremely important!
Version: 1.0.0 ( 6 August 2025 )
- Initial Release